How To Knit A Coaster

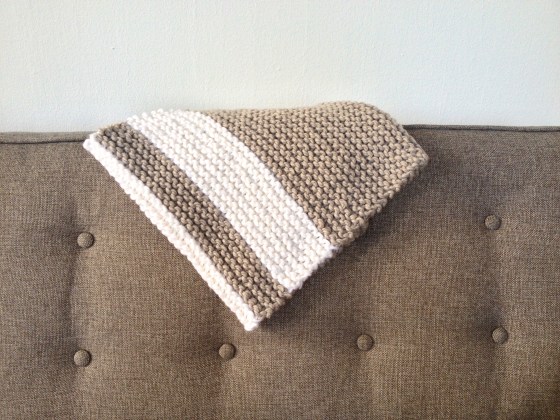
A few weeks back, one lucky winner claimed her #scissorsandsage contest prize.  I decided to make her a cozy coaster she could use on her breakfast table, night stand, or side table.  I had been wanting to learn how to knit the knot stitch, a beautiful stitch that creates perfect texture for a project like this one.  The Weekly Stitch provided a straightforward tutorial on how to create this stitch.  (I learn best from watching YouTube videos, so I was happy to see that her website had both a video and written tutorial.)

If you are looking for a last minute gift for the holidays, let me assure you that my slow knitting skills got me through this project in no time at all!  This knot stitch coaster would look great gifted in a set of 2 or 4, perhaps in different colors.  I used The Weekly Stitch’s pattern to create my own design with a border, and am really happy with how it turned out!
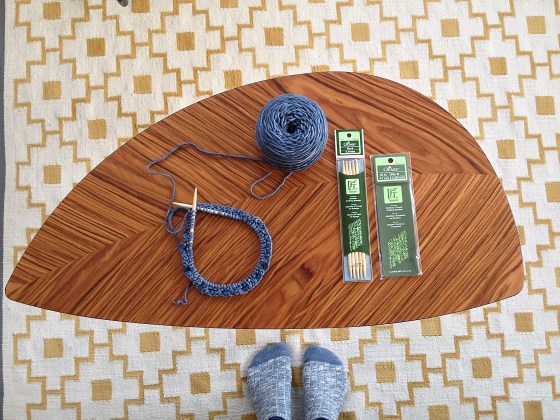
The Materials:

  • 1 skein, or a decent amount of leftover yarn
  • Size US 8 straight needles
  • Tapestry needle
  • Scissors

How-To:

  • Cast on 23 stitches
  • Garter stitch for 6 rows
  • Then:
  1. Knit 1 row
  2. Knit 3 stitches / purl 17 stitches / knit 3 stitches
  3. Knit 4 stitches / make knot* / knit 3 stitches / make knot / knit 3 stitches / make knot / knit 4 stitches
  4. Knit 3 stitches / purl 17 stitches** / knit 3 stitches
  5. Knit 1 row
  6. Knit 3 stitches / purl 17 stitches / knit 3 stitches
  7. Knit 7 stitches / make knot / knit 3 stitches / make knot / knit 7 stitches
  8. Knit 3 stitches / purl 17 stitches / Knit 3 stitches
  • Repeat steps 1-8 two-and-a-half times (ending on step 4)
  • Garter stitch for 6 rows
  • Cast off 23 stitches
  • Weave in ends with a tapestry needle

*To make a knot, purl 3 together and leave them on the left needle.  Knit these 3 together, and then purl these 3 together.  Finally, drop them off of the left needle.

**Be sure to purl each stitch on the backside of the knots separately.

That’s all there is to it!  Happy knitting!

Knitting A Pom-Pom Hat

As much as I want to believe that spring is around the corner, it most certainly is not.  Every year I think that post-Valentine’s Day = post-winter, and that the long days of hibernation are over.  False.  There are probably many more cold and snowy days to come (like this morning in Philly), and one must be extra ready for this blustering wind!  (Okay, it isn’t actually blustering.) Anyway, here is a hat that I recently finished making.  I’ve never knit a hat before (let alone anything on circular needles), so I was very excited to work on this project.

I picked up my knitting supplies for this hat at Rosie’s Yarn Cellar in Philadelphia.  The woman working at Rosie’s was kind enough to educate and guide me through the process of starting my project.  Later on, I decided to add a pom-pom for a more playful look, and I couldn’t be happier with the results!

The Materials:

  • 1 skein of Manos del Uruguay merino wool
  • 1 skein of a contrasting color for the pom-pom
  • Size 8 circular needles (16″)
  • Tapestry needle
  • Scissors
  • Note: I did not end up using the size 8 double pointed needles pictured below.

How-To:

  1. Cast on 87 stitches (use this hat size chart to find your size)
  2. Seed stitch for 1 1/2 inches
  3. Stockinette stitch until the hat is a total of 7 inches tall
  4. Begin decreasing on circular needles (learn how here)
  5. Set aside the finished hat (!!!) to begin making the pom-pom
  6. Use either the same yarn or a contrasting color to make the pom-pom (learn how here)
  7. Secure the pom-pom to the top of the hat using a tapestry needle

While I do hope that winter sees itself out sooner rather than later, this hat is sure to keep me warm in the meantime.  This pattern used about half the skein of Manos del Uruguay yarn, so I may use the other half for another project in the near future.  I love the subtle striation in the color.

Remember that it is never too late to start knitting.  I recently read an interesting article called “Don’t Stop Knitting! It Keeps You Healthy!”  Take this late-winter opportunity to start something new.  Peek into a local knitting store and see what they have to offer.  As my psychotherapy teacher said today, “The way to change your future is to change your present.”

Note: Photos by Victoria Vitale & Anne Kenealy.

Knitted Neck Warmer

The gift giving season took on a whole new meaning for me this year.  Learning to knit again has been such a fun experience these past few months, and I can’t seem to get enough of it.  I knit my sister, Elisabeth, a neck warmer to keep her cozy during these cold months.  Rather than knitting a looser and longer scarf, this accessory sits (somewhat) snugly around her neck.  The the yarn color I chose, Berry Pie Mix, complements her wonderfully wild and curly brown hair.

The Materials:

How-To:

  1. Cast on 25 stitches.
  2. Garter stitch for as many rows as needed to fit over your head.
  3. Bind off, leaving a three-foot tail of yarn for sewing.
  4. This pattern calls for a special twist at the end.  Here is a picture tutorial of how to create this:

This is a versatile accessory that could be worn in the fall, winter, and even early spring.  Choose a yarn color for a loved one and whip one of these up in no time for an upcoming birthday or Valentine’s Day!

Note: Pattern by Judy.

Ear Warmer Headband

I recently finished my second knitting project of the season: an ear warmer headband for my mom’s birthday!  It was a fun project because I was able to try out a new stitch and create my own pattern based on styles I saw online.  Before I gave it to my mom, I snapped a few pictures of the final product.The name of the stitch I used here is the seed stitch.  It is a most magnificent stitch that I will certainly use for future knitting projects.  It is so delicate and beautiful!  Once again, Knitting Tips By Judy helped me learn and become comfortable with my knitting skills.  The trick to using the seed stitch is to cast on an odd number of stitches.  Here are my own step-by-step directions:

What You’ll Need:

  • 1 skein of yarn (I used 50% wool/50% alpaca in charcoal grey)
  • Size 8 knitting needles
  • Hand sewing needle
  • Scissors

How-To:

  1. Cast on 15 stitches
  2. Alternate every stitch: knit-purl-knit-purl-etc.
  3. Make sure you start and end every row with a knit stitch
  4. Continue knitting until the headband fits comfortably around your head
  5. Cast off and sew in the yarn ends
  6. Whipstitch the headband closed
  7. For the small band, cast on 15 stitches and knit about 10 rows
  8. Cast off, sew in the yarn ends, and whipstitch the band closed around the ear warmer headband (this will produce the pleated look)
  9. Put it on and ENJOY!

For those of you who are looking to tidy up your own yarn collection, here is one way to do so.  I’ve started collecting toilet paper tubes to wind my yarn!


Have questions?  Any suggestions for future projects?  Leave a comment!

Cowl Me Crazy

‘Tis the season for all things cozy, so why not ring in this beautiful fall weather with a knit cowl scarf?  I haven’t picked up knitting needles in many years, so I thought I’d give it a go.  My grandma taught me how to knit when I was in elementary school, and it was something that we did together most days.  Granted I couldn’t knit a straight line for the life of me, but it was the time we spent together that was especially important.

This time around, I had to resort to another mode of learning how to knit again: YouTube.  Miracles do happen, folks!  One woman named Judy acted as my Knitting Fairy Godmother.  Her step-by-step instructional videos were incredibly helpful, and she is even a knitter to the stars.  (But really.)

The model in this post is my dear friend and fellow creative arts therapy student, Jacklin!

My girlfriend surprised me for my birthday with some of the above knitting tools and a gift certificate to a local yarn store, Loop.  I quickly went to check out the options and choose my yarn colors!  Here is a list of the supplies you’ll need for your very own cowl scarf:

  • Three skeins of Spud & Chloe Outer yarn.  I used two of Rhino & one of Snow Day.
  • Size 13 needles (9 mm)
  • Hand sewing needle
  • Knitting needle stoppers
  • Stitch counter
  • Scissors

My inspiration for making this scarf came from another blogger’s Katy Cowl.  I used her free pattern as a starting point for my project.

Here are my own step-by-step instructions on how to make my striped Cowl Me Crazy scarf.

  • Cast on 30 stitches of Rhino
  • Garter stitch for 28 rows
  • Change color to Snow Day and garter stitch for 14 rows
  • Change color to Rhino and garter stitch for 8 rows
  • Again, switch to Snow Day for 14 rows
  • Finish with 46 rows of Rhino
  • Bind off
  • Weave in all the loose ends from changing colors
  • Whipstitch the ends of the scarf closed in order to make a circle!

Happy knitting!