PLEASE VOTE! {Update: I won!}

Happy Saturday, readers! It’s pretty unusual to find me here on the weekend, so you know it has to be for good reason!

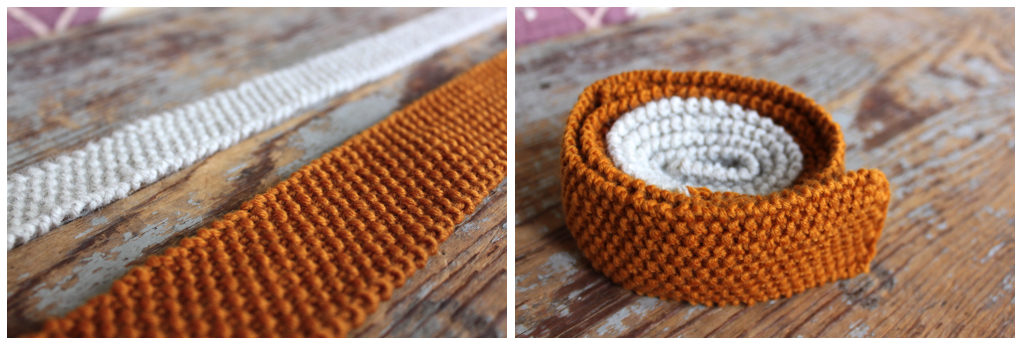
All Free Knitting is a website chockfull of free knitting patterns for all skill levels. They receive millions of views each week, and are a staple in a knitter’s online arsenal of tools. Back in October, the editor of All Free Knitting, Kathryn Abrams, reached out to me because she wanted to include my knit tie for Anne on her site (with a proper link back to Scissors & Sage). You can find that feature on All Free Knitting here.

Kathryn reached out again in March because she selected my knit tie to be a part of her latest e-book, 9 Men’s Knitting Patterns. (Click here to download it!) I couldn’t believe she wanted to feature me as one of nine patterns. The best part? I asserted that the pattern had to be introduced using inclusive language if she wanted to include me in the book.

THEN, Kathryn emailed me a few weeks ago to tell me that my tie had been hand-picked to be included in All Free Knitting’s “Top 5 Father’s Day Knitting Patterns” contest. I of course accepted the invitation! The winner is determined by the number of favorable comments they receive on All Free Knitting’s post. The winner gets a $50 Amazon gift card! If me and my tie model win, the card is going straight into our Ball jar labeled “Wedding Fund.” The contest is open until Friday, June 17th.

Readers, please take a moment to vote for Anne’s knit tie! It would be an honor to win this contest and be recognized for my knitting. Here’s how you can vote:

  1. Visit All Free Knitting’s “Top 5 Father’s Day Knitting Patterns” post.
  2. Leave a comment letting them know which of the five patterns is your favorite.

Not only will one of the knitting patterns win, but there’s something in it for you, too! All Free Knitting will choose one commenter at random to win a copy of their book, Simple Scarves Made with the Knook, and the Knook Kit.

Have a great weekend, everyone!

Picking Favorites: Warm Weather iPhone Wallpapers

Pinterest 1

My iPhone wallpaper is not something I usually think about. I find one I like — typically an image that Apple provides — and keep it for a year or more without even batting an eyelash. There are more pressing matters to worry about, no? I started to think about my wallpaper, though, when West Elm posted an Instagram photo of two new free wallpapers they designed. They were so cute that I instantly downloaded them. Now I see cute little blue fish when I check the time on my lock screen! Anything to get me in the mindset of sun and warmth.

This inspired me to round up other wallpapers from across the Internet. I knew there had to be more fun ones out there. Below you’ll find all kinds of images to welcome the (finally) warmer weather and get you ready for beach/swimsuit/bbq/picnic season.

Do you have a favorite iPhone wallpaper? Which is your favorite here? Below you’ll find directions for setting up your new wallpaper.

Watercolor

Strokes from ban.do

Lemons

Lemons from Neiko Ng

Mermaids Don't Cry

Mermaids from ban.do

Leaves

Leaves from Leah Goren

Pineapples

Pineapples from ModCloth

Clouds

Clouds from Yao Cheng

Watermelons

Watermelons from Wonder Forest

Watercolor Plants

Plants from ban.do

Watercolor Strokes

Watercolor from Lines Across

Swirls

Swirls from ban.do

Processed with VSCO with m5 preset

Flamingos from West Elm

Summer Fun

Summer Fun from ban.do

Processed with VSCO with m5 preset

Fish from West Elm

Strawberries

Strawberries from The Wonder Forest

Found a favorite? Here’s how it works.

If you’re reading this from your computer | Click on the image you’d like to use. Download it to your desktop, and then email or text it to your phone. Open the image on your phone, and save it to your camera roll. Open Settings > Wallpaper > Choose a New Wallpaper > Camera Roll. Select the image, move and scale it however you’d like, and make sure Still is highlighted (rather than Perspective). Click Set.

If you’re reading this from your phone/tablet | Click on the image you’d like to use. Press and hold and then click Save Image. Open Settings > Wallpaper > Choose a New Wallpaper > Camera Roll. Select the image, move and scale it however you’d like, and make sure Still is highlighted (rather than Perspective). Click Set.

Enjoy!

How To Sew A Drawstring Bag

It’s been raining in Philly lately, which until recently would have been a real bummer. Now I get to spend time working on my rain project! (In case you missed it, I’m teaching myself how to sew.) My first project last week was sewing a table cloth for our dining table. I found a great black linen fabric at Jo-Ann Fabric, and I am really happy with how it turned out.

A few days later, I decided to up my sewing game and make a drawstring bag. I again found the fabric (and string) from Jo-Ann. I knew I’d need a pattern to work from, and Purl Soho had a beautiful pattern tutorial that I decided to use. This project was easier than the table cloth in some ways (less fabric to manage), and harder in others (more intricate details in the sewing). I’ve learned something new about sewing in both of these projects, and I’m pretty excited to continue learning more. Next up: a cafe apron! I’ve already picked out my fabric, and it’s sitting pre-washed and ironed by the sewing machine.

I’m not going to write out a DIY tutorial for this drawstring bag because 1) I followed Purl Soho’s directions almost completely, and 2) I don’t feel strong enough in my sewing skills yet to be able to relay a project in my own words. If you’d like to make a bag like this one, head over to Purl Soho for their tutorial!

PS) Purl Soho recommends using this drawstring bag for shoes, but I say it can be used for all kinds of things. Use it in your travel suitcase for more delicate items, wrap a gift in it, or use it as your knitting bag! It’s versatile and fun to make. Happy sewing!

How To Knit A Tie

Over the past two years or so, I’ve really gotten back into knitting. My grandma taught me when I was much younger. We’d sit on the couch together after I got home from elementary school, and she’d patiently teach me how to knit. My grandma was a very quiet person, but we did so much together (knit, watch Nick at Nite, eat snacks after school, pick flowers from the yard). She was a wonderful teacher.

After she passed away, I let many years go by before trying to knit again. Last year, I finally finished a scarf we had been knitting together for my dad. I didn’t remember how to knit, so I turned to one woman’s YouTube channel to learn again. Knitting Tips By Judy is a wonderful resource for knitters of all levels. Her tutorials are clear and concise, two important qualities for the beginning (or returning!) knitter.

My inspiration for knitting a straight tie actually came from another knitter, Kristen McDonnell of Studio Knit. Anne occasionally wears ties to work (she’s a teacher), and so I thought that she’d really appreciate a hand-knit tie! I altered Kristen’s tutorial slightly, so let me share my process with you. I decided to jazz things up with a contrasting color on the tie’s tail.

Using seed stitch for a tie is ideal because it holds its shape well and is reversible — meaning it looks the same on the front and back of the work. I find seed stitch to be an attractive stitch for all kinds of knitwear, even though some knitters find it tedious to switch between knit and purl every stitch.

Hand-Knit Straight Tie

Materials:

  • Two skeins of wool yarn in different colors (Use yarn that is meant for size US 8 needles)
  • Size US 5 straight needles
  • Tapestry needle
  • Scissors

How to Knit the Tie:

  1. Cast on 11 stitches using the color for the front of the tie
  2. Seed stitch for 21 inches
  3. Decrease to 9 stitches by knitting 2 together on both ends of the work
  4. Seed stitch for 1 inch
  5. Decrease to 7 stitches by purling 2 together on both ends of the work
  6. Seed stitch for 10 inches
  7. Switch yarn colors and continue seed stitch for another 22-24 inches
  8. Cast off and weave in ends

How to Knit the Keeper Loop:

  1. Cast on 11 stitches using the color for the front of the tie
  2. Seed stitch for 1 inch
  3. Cast off, but do not weave in ends
  4. Use yarn tails and the tapestry needle to sew the keeper loop to the back of the tie, approximately 7 inches from the bottom of the tie

Now that you’ve finished knitting your tie, it is important to block it. This will relax the yarn fibers, and help the tie sit flat against the torso. You can block the tie every few times it is worn in order to help maintain its shape. What’s great is that blocking can be done for all kinds of projects. Here’s how I do it.

Steam Block Your Work

Materials:

  • Ironing board and iron
  • Hand towel
  • T-pins

How-To:

  1. Soak the hand towel in water, and then gently squeeze out any excess water.
  2. Place your work flat on the ironing board, and lay the wet towel over your work. Stamp the hot iron over the wet towel, and you will start to see steam rise from the towel. Continue this process over the entire towel for about 1-2 minutes. Note that the towel and your work will both be incredibly hot.
  3. Remove the towel, and use t-pins to hold your work in place. These pins can go directly into the ironing board. Ensure that the yarn is not being pulled too far, but rather just enough to force your work into the desired shape.
  4. Once your work is bone dry, remove the t-pins. You’re done!

How To Knit A Toddler’s Hat

When children are involved, it’s hard to contain your inner DIYer. Am I right? The options are limitless! Anne and I recently met our friends’ near-two-year-old, and I was inspired to bring along something knit for her. She opened the gift, said, “Hat!” on repeat, and flung it over her curly hair. She wore it to bed. I was happy as a clam.

When it came to actually knitting the pom-pom hat, I was a bit stumped as to the size it should be. I followed this size chart that proved to work quite well. Ultimately, I erred on the loose side so that she could grow into it in future seasons.

This project is easy and quick to knit up. If you’re new to knitting, or want to trying working in the round, I would give this project a try! (Find my adult version here.) I include video links to several of the steps below because they do a great job of clearly demonstrating how each step is completed.

Toddler’s Pom-Pom Hat

The Materials:

  • 1 skein of yarn
  • Contrasting color yarn for the pom-pom
  • Size US 8 circular needles (16″)
  • Tapestry needle
  • Scissors

How-To:

  1. Cast on 75 stitches
  2. Knit 3 / purl 2 (repeat this until the hat rim is one and a half inches tall)
  3. Stockinette stitch until the hat is 8 inches tall
  4. Decrease on circular needles until too few stitches are left to knit (learn how here)
  5. Close hat (learn how here)
  6. Set your finished hat aside and make your pom-pom (learn how here)
  7. Attach and secure the pom-pom to your hat using a tapestry needle (skip to 12:05 and learn how here)
  8. Weave in any ends of yarn

This hat would make a great gift for any child. It is sure to be something they come back to for a few seasons to come!