Fire Cider with Liz

Hi there Scissors & Sage community,

My name is Liz, also known as Victoria’s sister! Victoria asked me to share a recipe and tradition that I introduced to our family several years ago. I’m a practitioner of acupuncture & herbal medicine, and of all the remedies I’ve brought back to our family over the years, this one has probably been the biggest hit. 

How are you feeling these days? Winter is just around the corner, and this year it is important to keep our immune systems strong and have tools at the ready in the case that we do start to feel unwell. Fire cider is a perfect remedy to have on hand for treating any sort of viral or bacterial infection, from the flu to the common cold. It can also be taken in a prophylactic manner, meaning on a regular basis in order to prevent getting sick. A teaspoon a day can keep the doctor away! Fire cider is an extraction of various plants and herbs, many of which you are probably familiar with already through cooking, which has been used for hundreds of years. 

One thing that I love about making fire cider is that it’s quite simple, and there are no exact measurements involved. If you try making it and love it, I encourage you to play around and try out various recipes. First, here are the basic ingredients and instructions that you will always want to include and follow:

  • ginger root
  • horseradish root
  • garlic cloves
  • onion
  • apple cider vinegar
  • honey
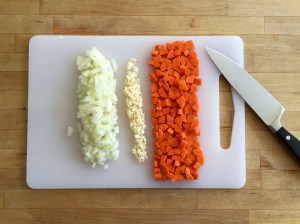
  1. chop ginger, horseradish, garlic and onion
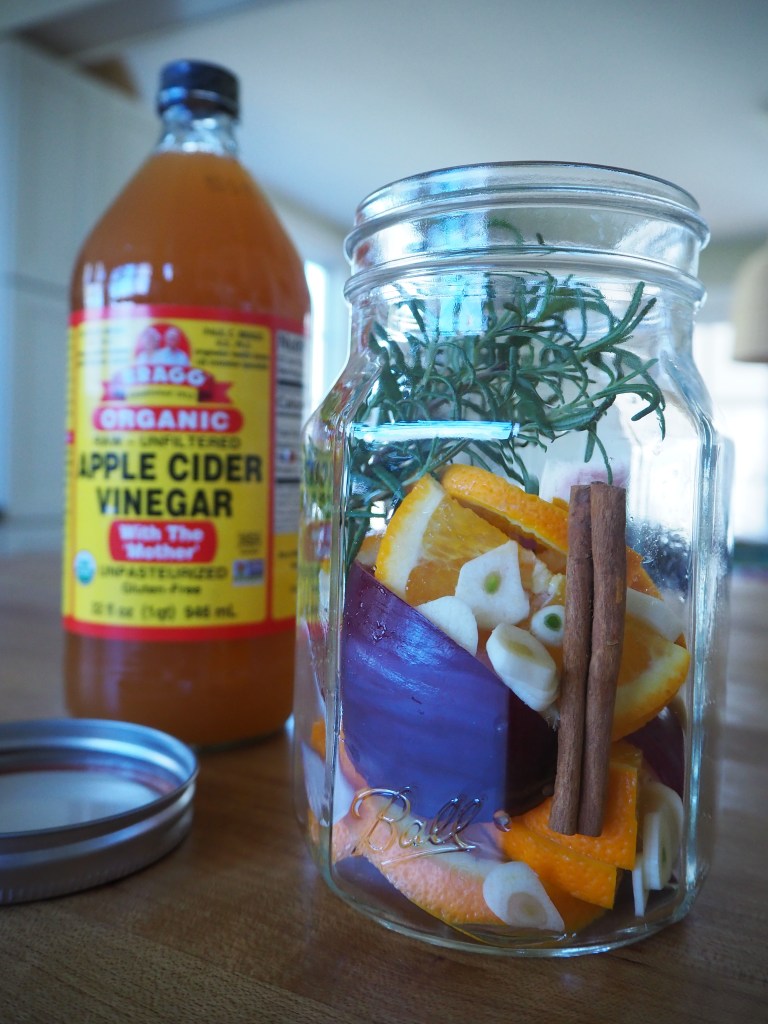
  2. put above ingredients into a jar that can be sealed with a lid
  3. pour apple cider vinegar into the jar, covering the above ingredients
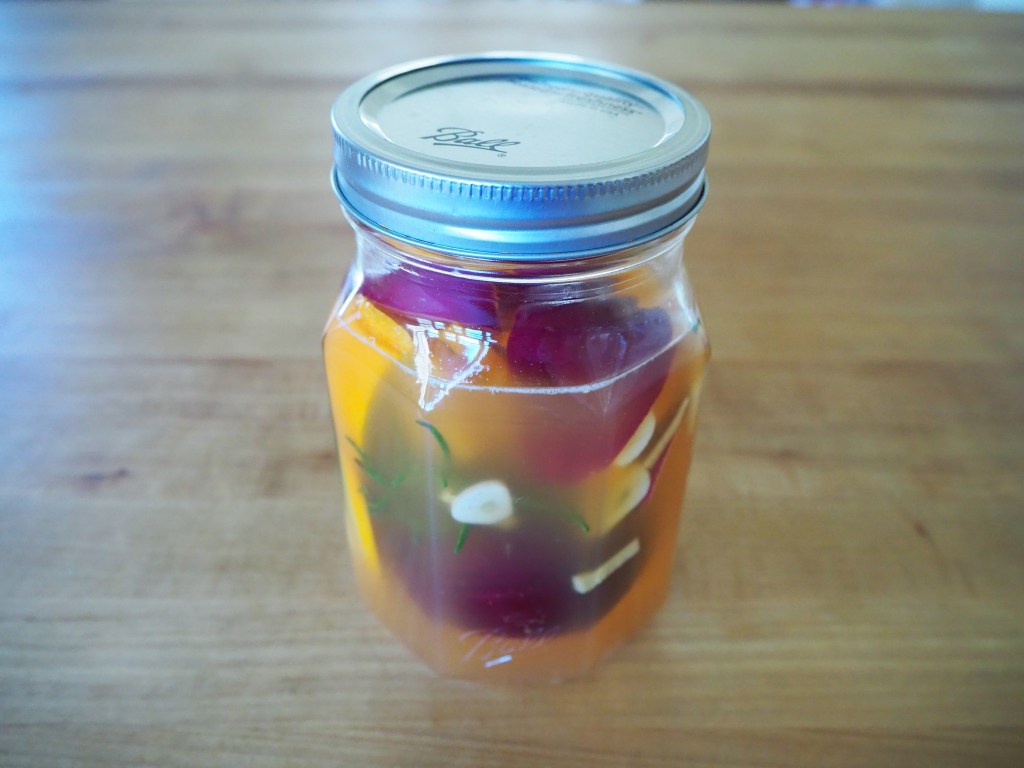
  4. place a piece of parchment or wax paper under the lid
  5. store in a cool, dark place for 3 or 4 weeks, shaking daily
  6. strain using cheesecloth, squeezing out as much liquid you can
  7. add honey to taste

Ginger, horseradish, garlic and onion all have anti-microbial properties and therefor help our systems fight off microbes that cause things like the flu and common cold. Apple cider vinegar helps lower blood sugar and improve health of the heart. Of course honey helps make this remedy more tasty, but it also offers great health benefits! Honey is both antibacterial and anti-inflammatory. In addition to the ingredients listed above, here are other things that I love to include, most of which are also anti-microbial and add wonderful flavor:

  • cinnamon sticks
  • rosemary springs
  • citrus peel
  • turmeric root
  • hot peppers

Here is a video I love where the legendary herbalist Rosemary Gladstar walks through the steps of making fire cider and gives some fun history of this remedy along the way. It is a real joy to make medicine, one that I hope you will love as well. A few years ago, there was a company that started selling fire cider and actually tried to patent it. The nerve – to try to make an ancient folk remedy exclusive! Many herbalists, including Rosemary Gladstar worked hard to make sure that this did not come to pass. By making this remedy for yourself and your community, you are helping to keep this tradition alive and accessible. 

I wish you all great health this season, and I’d love to hear how it goes with your fire cider! You can find me on instagram @OceanHeartAcupuncture, or OceanHeartAcupuncture.com

With Heart,

Liz

30-Day “Reset” Challenge

January tends to get all the credit for “starting over.” I don’t know about you, but when January rolls around, our kitchen counters are still full of leftover holiday desserts, our Christmas tree still has opened presents under it, and the last thing on my mind is going to the gym.

February is usually a slog, although this year a little less! It’s leap year, so today I feel like I am winning at life. Plus, it’s my once-every-four-years half birthday. Yeah!

March is where it’s at. It’s almost spring! We, at large, cannot accept the fact that climate change is a real, scientifically-proven thing that is happening, and yet we whole-heartedly trust a ground hog when he pops up to tell us spring is coming early this year. I guess I’ll take what I can get. These hints of warmer weather in Philly recently have just been the best.

So with spring on the mind, I’ve been inspired to try my first-ever challenge. Let it be known: you can eat as much dessert as you want in this challenge, and I will never suggest that you should go to the gym. This is a different kind of challenge. A “reset” challenge if you will. I like the idea of starting fresh with the changing season, and making new growth with nature. If there is one thing I know to be true, it is the importance of living simply.

The objective of this challenge is simple: Complete each task every day, and don’t beat yourself up if you miss one here or there. It’s okay.

Download the image to your computer (click here). Print it out and hang it in your kitchen. Write out the tasks in your calendar or planner. Whatever will help you most in completing each day’s challenge is what I want you to do. If this is your first time trying a month-long challenge, I am joining you in that! Let’s reconvene in April to discuss how it went.

Leave a comment if you’re participating. I’d love to hear how you’re going to stick to your daily tasks! (I’m putting them in our monthly calendar.)

Inspiration for my 30-day “reset” challenge came from Apartment Therapy and Into Mind.

Moroccan Chickpea Soup

I don’t think that I’ve mentioned this on Scissors & Sage before, but beyond my work as a music therapist, I’m also part-time at a home and garden store outside of Philly called terrain. I was hired as a seasonal nursery associate, and have been really enjoying my time there.

Over the weekend, terrain had its holiday open house–a huge event that kicks of the season with festivities for all. I decided to enter myself into the employee soup competition with an original recipe for Moroccan chickpea soup. Although it didn’t win, I do think that it’s worth sharing here. Many people enjoyed it for its spicy kick and flavorful ingredients. It’s a recipe that I know I’ll come back to several times this winter.

It’s worth noting that this recipe happens to be vegetarian, vegan, and gluten free. Perfect for most any food restriction! I hope that you enjoy it, and that it warms your bones. It just got really cold in Philly.

Happy Thanksgiving!

Moroccan Chickpea Soup

Prep time: 15 minutes | Cook time: 1 hour | Yields: 4 quarts

Ingredients:

  • 4 carrots, diced
  • 2 Yukon gold potatoes, diced
  • 1 large yellow onion, diced
  • 3 cloves garlic, minced
  • 32 oz canned chickpeas, drained and rinsed
  • 3/4 cup liquid from a can of chickpeas
  • 1/2 tsp cayenne pepper
  • 1/2 tsp cinnamon
  • 1/4 tsp paprika
  • 1/4 tsp freshly ground coriander
  • 64 oz vegetable broth
  • 28 oz canned diced tomatoes
  • 1 tbs tomato paste
  • zest of 1/2 a lemon

Heat olive oil over medium heat in a large pot. Add onions and garlic, and sauté until cooked. Add spices and toast, stirring continuously. Deglaze using one cup of vegetable broth.

Add carrots and potatoes, and cook for five minutes. Add liquid from the chickpea can, and cook for five additional minutes.

Add diced tomatoes and cook for five minutes. Stir in tomato paste. Add remaining vegetable broth and bring to a boil. Reduce to a simmer, and cover for 15 minutes.

Add chickpeas and lemon zest, and simmer for a final 5-10 minutes. Enjoy immediately, or refrigerate in an airtight container for up to five days.

From Scissors & Sage 

Rain Project

A few weeks back, I temporarily inherited a sewing machine that’s been in my family for over 30 years. I say temporarily because it’s my mom’s sewing machine. My grandpa–who was a custom tailor at Bergdorf Goodman–sewed many a things on this machine for my sister and me growing up. If you haven’t realized through reading Scissors & Sage yet, my grandparents have been a big influence on the person I am becoming. Their values and morals–and good taste in music and in food–shaped me over the many years they came over to help take care of us.

When my dad dug out this sewing machine from our basement at home and brought it down to Philly, we hesitantly set it up on my drafting table, plugged it in, and flipped the switch. The light came on and it was ready to be used–almost as if it were waiting to be used. We read through the instruction manual and learned the basics. I’ve since tested out a few stitches on scrap fabric, but now I want to really get going with it.

That’s where my rain project comes in. The point of a rain project is to choose something that you have been wanting to get started on, but haven’t found the right moment for. It should be a project that is both ongoing and has no deadline. Work on it on days that it is raining, and time spent indoors feels cozy and right. It could be a new skill, like learning to sew, or knitting a big blanket for the first time. It could even be teaching yourself how to bake, working your way through a cookbook, or organizing every closet in your home. It’s up to you. The only requirement is that you take it nice and slow. Your rain project might turn into a snow project (yay snow days), and then back to a rain project come spring.

I’ll certainly be reporting back regarding my sewing progress. I have two projects in mind that I think will be good for a beginner like myself. (Sixth grade sewing club feels mighty far away right now.) Do you sew? Do you have any patterns that you’ve found especially satisfying and fun? Please send them my way!

Will you be joining me in your own rain project?

How To Knit A Toddler’s Hat

When children are involved, it’s hard to contain your inner DIYer. Am I right? The options are limitless! Anne and I recently met our friends’ near-two-year-old, and I was inspired to bring along something knit for her. She opened the gift, said, “Hat!” on repeat, and flung it over her curly hair. She wore it to bed. I was happy as a clam.

When it came to actually knitting the pom-pom hat, I was a bit stumped as to the size it should be. I followed this size chart that proved to work quite well. Ultimately, I erred on the loose side so that she could grow into it in future seasons.

This project is easy and quick to knit up. If you’re new to knitting, or want to trying working in the round, I would give this project a try! (Find my adult version here.) I include video links to several of the steps below because they do a great job of clearly demonstrating how each step is completed.

Toddler’s Pom-Pom Hat

The Materials:

  • 1 skein of yarn
  • Contrasting color yarn for the pom-pom
  • Size US 8 circular needles (16″)
  • Tapestry needle
  • Scissors

How-To:

  1. Cast on 75 stitches
  2. Knit 3 / purl 2 (repeat this until the hat rim is one and a half inches tall)
  3. Stockinette stitch until the hat is 8 inches tall
  4. Decrease on circular needles until too few stitches are left to knit (learn how here)
  5. Close hat (learn how here)
  6. Set your finished hat aside and make your pom-pom (learn how here)
  7. Attach and secure the pom-pom to your hat using a tapestry needle (skip to 12:05 and learn how here)
  8. Weave in any ends of yarn

This hat would make a great gift for any child. It is sure to be something they come back to for a few seasons to come!