Fire Cider with Liz

Hi there Scissors & Sage community,

My name is Liz, also known as Victoria’s sister! Victoria asked me to share a recipe and tradition that I introduced to our family several years ago. I’m a practitioner of acupuncture & herbal medicine, and of all the remedies I’ve brought back to our family over the years, this one has probably been the biggest hit. 

How are you feeling these days? Winter is just around the corner, and this year it is important to keep our immune systems strong and have tools at the ready in the case that we do start to feel unwell. Fire cider is a perfect remedy to have on hand for treating any sort of viral or bacterial infection, from the flu to the common cold. It can also be taken in a prophylactic manner, meaning on a regular basis in order to prevent getting sick. A teaspoon a day can keep the doctor away! Fire cider is an extraction of various plants and herbs, many of which you are probably familiar with already through cooking, which has been used for hundreds of years. 

One thing that I love about making fire cider is that it’s quite simple, and there are no exact measurements involved. If you try making it and love it, I encourage you to play around and try out various recipes. First, here are the basic ingredients and instructions that you will always want to include and follow:

  • ginger root
  • horseradish root
  • garlic cloves
  • onion
  • apple cider vinegar
  • honey
  1. chop ginger, horseradish, garlic and onion
  2. put above ingredients into a jar that can be sealed with a lid
  3. pour apple cider vinegar into the jar, covering the above ingredients
  4. place a piece of parchment or wax paper under the lid
  5. store in a cool, dark place for 3 or 4 weeks, shaking daily
  6. strain using cheesecloth, squeezing out as much liquid you can
  7. add honey to taste

Ginger, horseradish, garlic and onion all have anti-microbial properties and therefor help our systems fight off microbes that cause things like the flu and common cold. Apple cider vinegar helps lower blood sugar and improve health of the heart. Of course honey helps make this remedy more tasty, but it also offers great health benefits! Honey is both antibacterial and anti-inflammatory. In addition to the ingredients listed above, here are other things that I love to include, most of which are also anti-microbial and add wonderful flavor:

  • cinnamon sticks
  • rosemary springs
  • citrus peel
  • turmeric root
  • hot peppers

Here is a video I love where the legendary herbalist Rosemary Gladstar walks through the steps of making fire cider and gives some fun history of this remedy along the way. It is a real joy to make medicine, one that I hope you will love as well. A few years ago, there was a company that started selling fire cider and actually tried to patent it. The nerve – to try to make an ancient folk remedy exclusive! Many herbalists, including Rosemary Gladstar worked hard to make sure that this did not come to pass. By making this remedy for yourself and your community, you are helping to keep this tradition alive and accessible. 

I wish you all great health this season, and I’d love to hear how it goes with your fire cider! You can find me on instagram @OceanHeartAcupuncture, or OceanHeartAcupuncture.com

With Heart,

Liz

Macramé with Rebecca Landman

diamondstitch_27

Today’s blog post comes to us from my friend and fellow crafter, Rebecca Landman. Rebecca and I met in college in upstate New York, and while she lives in California and I live in Chicago now, I’ve been following her crafting endeavors on social media for some time. She is a real inspiration, both because of the creativity in her work and because she isn’t afraid to tackle big projects that demand problem solving and patience. #creativethoughtmatters

Be sure to follow Rebecca on Instagram to see her latest macramé and natural dyeing creations. They are absolutely beautiful!

diamondstitch_28

From Rebecca: Macramé found me via frustration. My partner Chris and I had just moved into a new apartment. I was desperate to decorate our barren living room with some sort of cozy, textured wall hanging. Weavings, macraméd pieces, whatever! I wasn’t being picky.

But Chris saw this move as my opportunity. He’d just watched me finish crocheting my third blanket. He’d seen me obsess over weavings and macraméd pieces for basically forever. He’d developed this unwavering confidence in my creativity. A confidence I’d never really been able to wrangle in myself before. So each time I’d lust all hot and bothered (hi there, frustration) after something on Etsy or at basically any LA boutique in my general vicinity, he’d lightly remind me that I was a designer. I was a maker. I could easily create something even more beautiful. Our perfect something.

Me? Me? I’m not sure. I don’t think so! But no, Chris knew so. He believed in me. His steady stream of confidence slowly started making its way into my mind. Hmm. Well, maybe I could at least try.

I took a beginner macramé class and then another class on natural dyeing. Soon, I was buying rope by the yard, spending hours each night searching the web for all sorts of different natural dyeing techniques, and following along with as many YouTube knot-tying tutorials as my little hands could bare. Rope burn is real, people. You have been warned.

But guess what? Chris was right. I could totally make that.

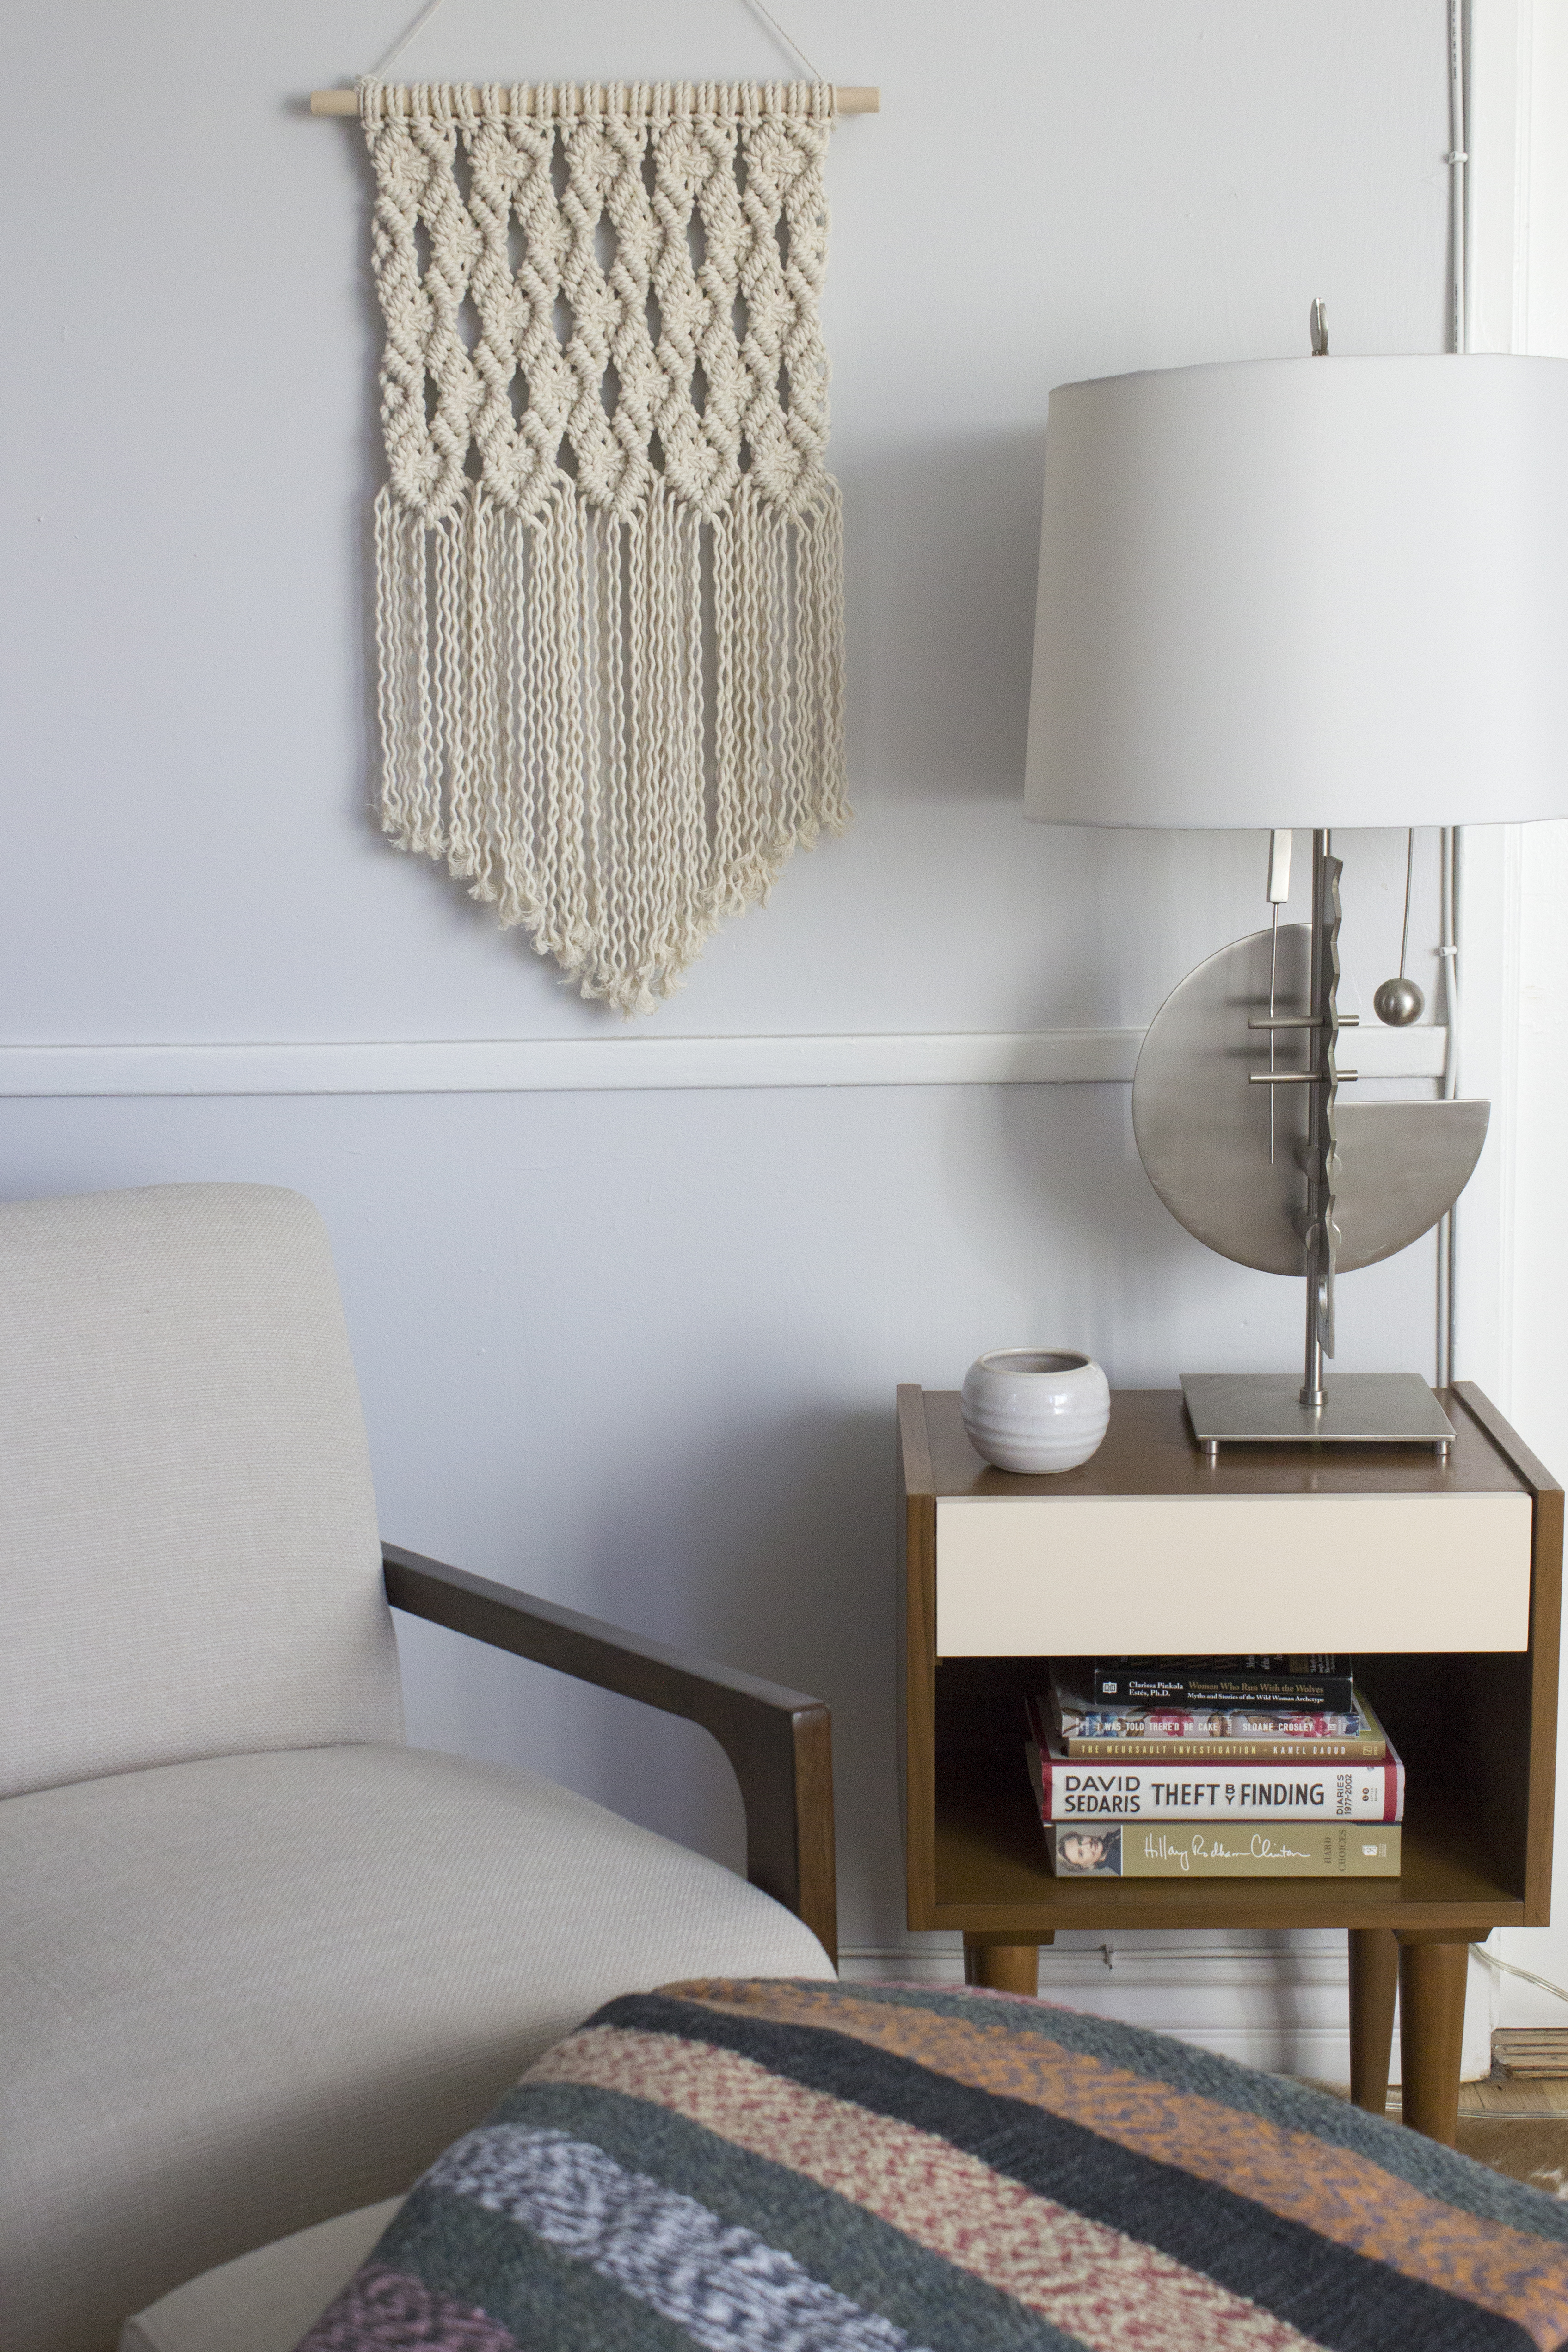
A year and a half later I’ve started an Etsy shop, created a few wall hanging patterns I love, and have scheduled macramé in as a regular part of my daily routine. The following pattern is one of my favorites I’ve been making thus far.

DIY Diamond Macramé Wall Hanging

diamondstitch_25

Materials:

  • 250 feet of 3/16″ organic cotton rope, available here
  • 7/8” wooden dowel, at least 17″ long
  • Masking tape
  • Sand paper
  • Hand saw
  • Tape measure
  • Scissors
  • Clothing rack
  • Two s-hooks

1:2

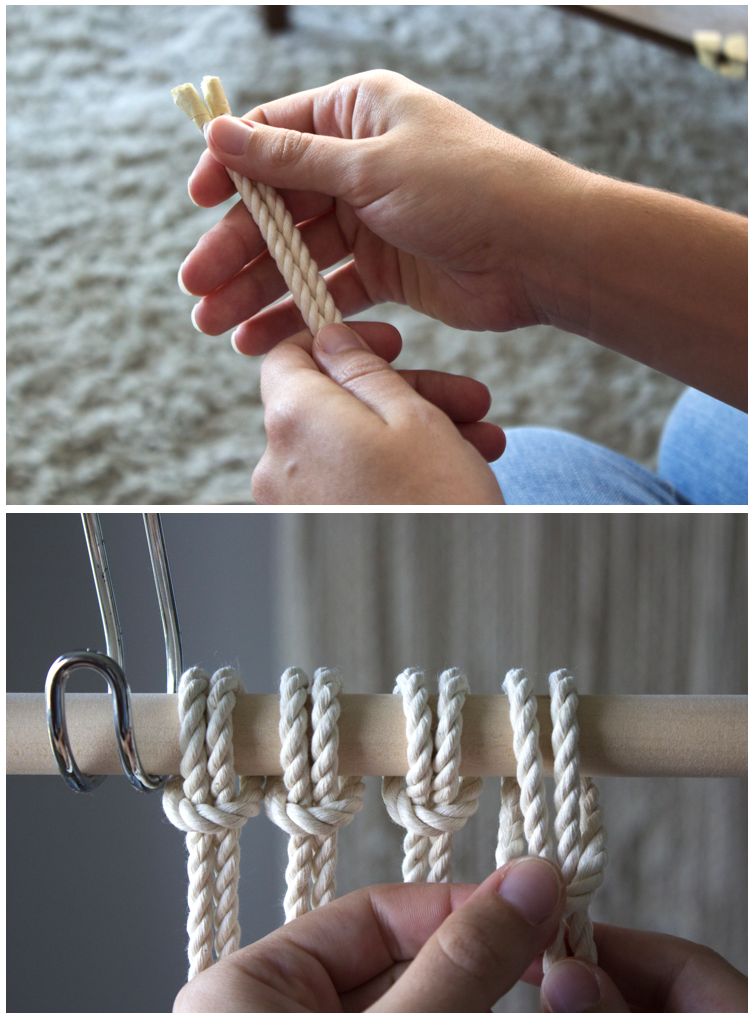
Step 1: Cut 20 pieces of rope, 150″ long each. Secure each loose end of rope with masking tape.

Step 2: Place the s-hooks on your clothing rack and your wooden dowel on the s-hooks.

Step 3: Cast each piece of rope onto your dowel by folding the rope in half, threading the looped fold over the dowel, pulling both ends of the folded rope through the loop, and pulling tight. Starting from the left-hand side of your dowel, label each of your working ropes by number on the masking tape. #1 will be your left-most rope and #40 your right-most rope.

*From this point on, think of each half piece of rope as its own entity — so each long, 150-inch piece of rope you halved and looped over the dowel is now two distinct pieces of working rope.*

3:4

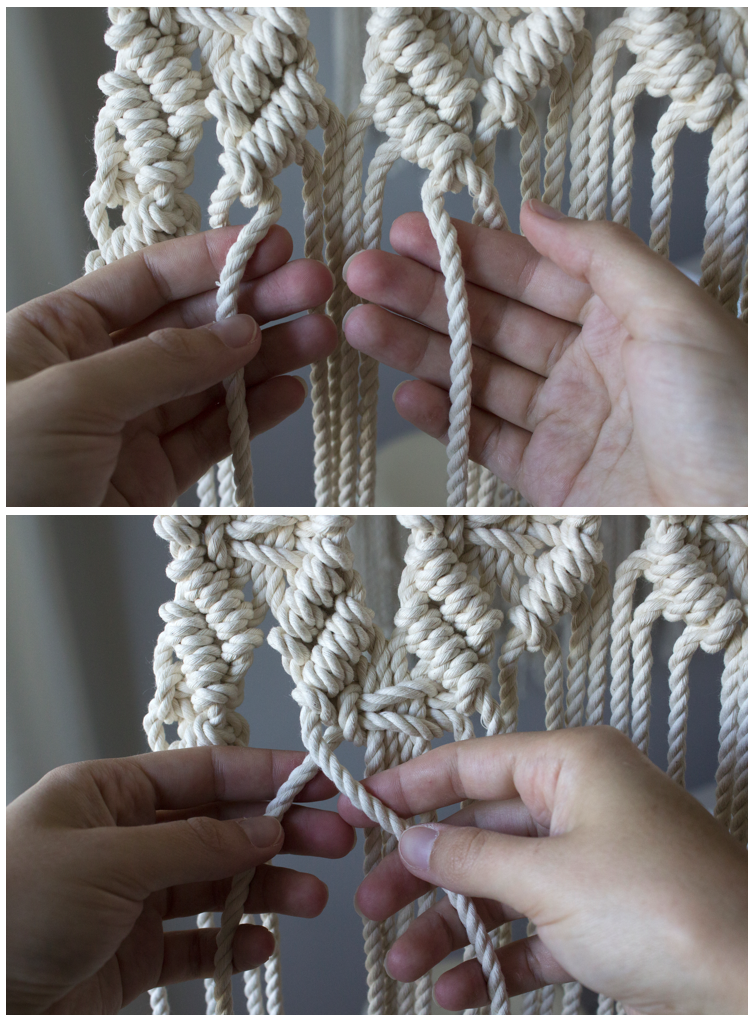
Step 4: Pull the fourth rope from the left-hand side of your work diagonally to the left across the three ropes directly to its left. Take the piece of rope to its left (Rope 3) and place it over and around Rope 4. Pull it tight to make a knot, all the while holding Rope 4 at that diagonal. Repeat for a second knot with Rope 3.

Step 5: Repeat Step 4 with each of the two ropes to the left of Rope 3 (Ropes 2 & 1). Now you’ve tied your first row of diagonal clove hitch knots!

5:6

Step 6: Pull the fifth rope from the left-hand side of your work diagonally to the right across the three ropes directly to its right. Take the piece of rope to its right (Rope 6) and place it over and around Rope 5 (the opposite way you went in Step 4). Pull it tight to make a knot, all the while holding Rope 5 at that diagonal. Repeat for a second knot with Rope 6.

Step 7: Repeat Step 6 for each of the two ropes to the right of Rope 6 (Ropes 7 & 8), thus completing your second row of diagonal clove hitch knots.

7:8

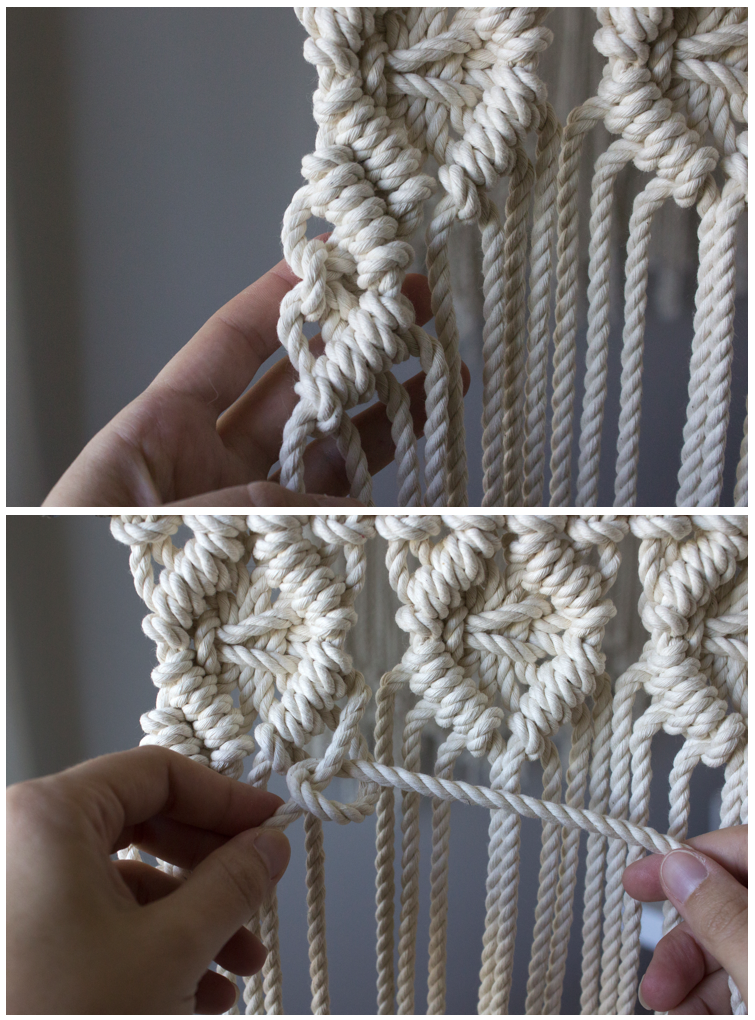
Step 8: Leave your two outer ropes in the eight-rope set be (Ropes 4 & 5), and make a square knot tying Ropes 1 & 8 around Ropes 2, 3, 6, and 7. To do so, wrap Rope 1 around the front of your four central ropes while simultaneously wrapping Rope 8 around the back. Holding each rope loosely wrapped around the four central ropes, you’ll see that you created two loops on either side of the central ropes. Thread the end of Rope 1 through the right-hand loop front to back while threading Rope 8 through the left-hand loop back-to-front. Pull tight to secure. Now reverse it — thread Rope 1 back across the front of the four central ropes and Rope 8 back around the back. Thread through their respective loops, now in the opposite direction as the knot you just tied. Pull tight and your first square knot is complete!

9:10

Step 9: Finish off your diamond with a row of diagonal clove hitch knots along the bottom, again using Ropes 4 & 5 as your diagonal anchor ropes.

11:12

Step 10: Repeat Steps 4-9 for each of the four sets of four working ropes along your dowel.

13:14

Step 11: Tie a second line of diagonal clove hitch knots right underneath your knots from Step 9, using each diamond’s new outer ropes as your anchor ropes.

Step 12: Tie square knots like you did in Step 8 in between each new set of diagonal clove hitch knots.

15:16

Step 13: For the sides of your work — the ones where you can’t make a full diamond — you can create a half diamond. Leave the anchor rope from the previous set of diagonal clove hitch knots be, and you will have three working ropes. Take the two outer ropes of the three and tie a square knot around the single central rope. Line it with two lines of diagonal clove hitch knots just like the full diamonds.

17:1819:20

Step 14: Continue tying these diagonal clove hitch/square knot diamonds until you’ve got five rows’ worth ending in a single row of diagonal clove hitch knots. Or keep going! Or stop earlier! You do you. I also like to finish my final row of diagonal clove hitch knots using one of my anchor ropes as a working rope and tying the two sides together. I do this in the same direction for each of my five diamonds.

Step 15: Once you’ve reached your happy tying conclusion, it’s time to trim and unravel. Cut your remaining rope into any shape you’d like. I chose a triangular shape, but you could also do a straight line, a zig zag, or something more organic.

21:22

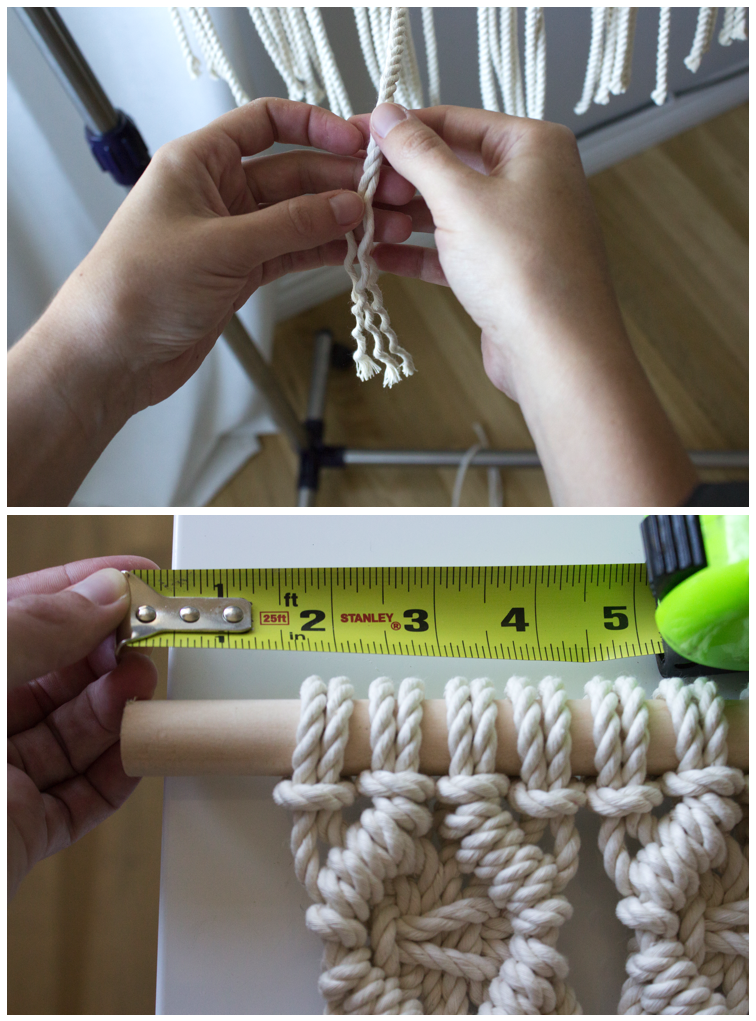
Step 16: Use your fingers to unravel the strands of rope up until you reach the last knot you tied. Trim and shape the unraveled rope as necessary.

23:24

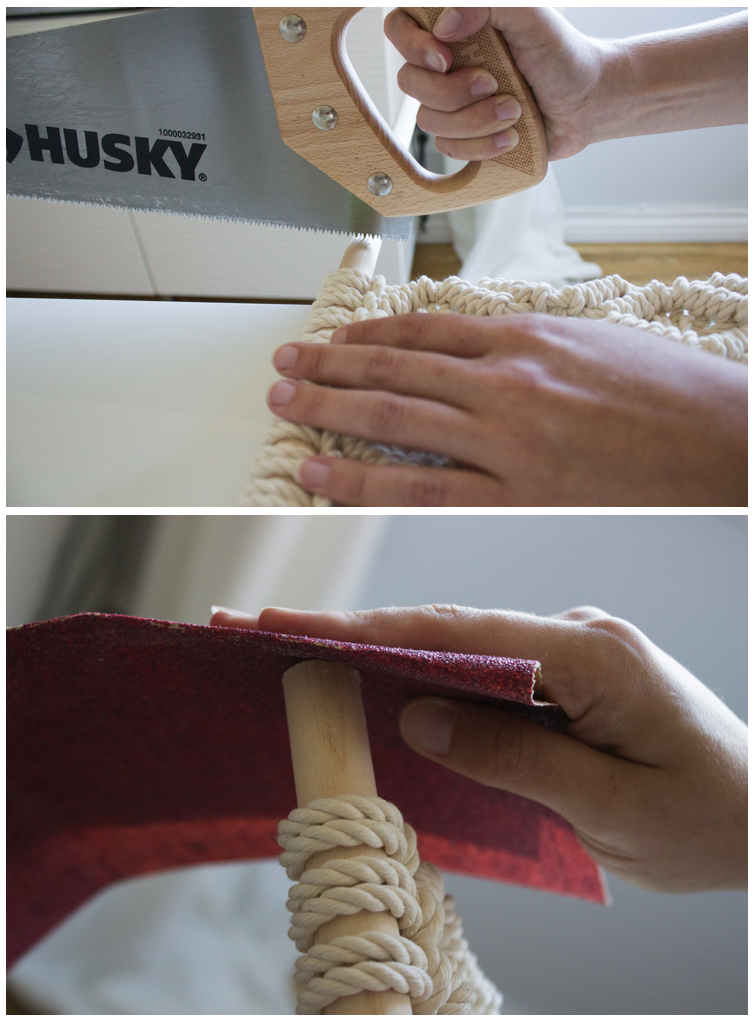
Step 17: Depending on how long your dowel is, if it needs a trim, now’s the time. Situate your final piece exactly how you’ll like it on the dowel, and trim down the sides with a hand saw.

Step 18: Sand the dowel edges for a nice clean finish.

Step 19: Hang on the wall and enjoy! You can either fashion a hanger out of some rope or thinner cord, or screw a few c-hooks into your wall and rest the dowel on those.

diamondstitch_26

I never intentionally set out to create this pattern. I’d actually been stuck for weeks trying to work out a different design. No matter how hard I worked that different design, though — tied, untied, retied, tried this, tried that — it just wasn’t working (oh hey there, frustration. Missed you, girl). Suddenly, macramé wasn’t feeling fun. It was feeling daunting. I needed to put my impossible idea down for a second, quiet all this anxiety I was now feeling over honestly just a pile of rope, and let myself play.

Allowing myself space to play gave this diamond design its opportunity to emerge. Instead of forcing whatever farfetched idea wasn’t bending to my will, I let go and trusted that something easier would come. And it did! Not only have I gleaned this satisfying pattern from my play time, but I’ve also learned to be gentler with my process — with myself. Now, I leave myself more room to breathe, think, try and try again.

Please gift yourself this same luxury. You can do it. You can make that. I know you can.

All photos taken by Rebecca Landman

Spooky Sinner Cider Cocktail

This post comes courtesy of Anne Kenealy, Scissors & Sage’s number one fan and frequent behind-the-scenes editor. This isn’t her first post on the blog, although her last how-to was much more technical than the cocktail recipe that follows. She’s made this drink for many a guest, and everyone always seems to enjoy it. Make it at your next gathering, and it’ll be a crowd-pleaser!

From Anne: Every autumn around apple-picking season, this cocktail returns to our regular rotation here at the international headquarters of Scissors & Sage. Its sweet-tart zing makes it an almost irresistible tonic when the weather begins to cool, and it’s great in big batches for Halloween (hence its name) or Thanksgiving.

Non-alcoholic ginger beer has been a favorite cocktail mixer of ours since Moscow mules came back into vogue. Its snappy heat and carbonation allow it to blend well with neutral liquors like vodka and to balance stronger, smokier whiskeys. When we mixed it with fresh apple cider, the sweetness of the cider was cut by the spice of the ginger, and we knew we’d found a perfect match.

Spooky Sinner Cider Cocktail

Ingredients for two cocktails:

  • 3 oz. vodka
  • 6 oz. fresh apple cider
  • 4 oz. ginger beer (We use the non-alcoholic Reed’s Extra Ginger Brew.)
  • Two handfuls of ice
  • Two thin slices of apple (for garnish)

Add a handful of ice to a rocks glass and slip a slice of apple down the side of the glass, so that it’ll be visible when the drink is poured. Add 1.5 oz. vodka and 3 oz. apple cider. Top with 2 oz. ginger beer and stir to mix.

From Scissors & Sage 

Enjoy!

ALL PHOTOS TAKEN BY ANNE KENEALY

DIY Gardening: Starting Seeds in Recycled Egg Cartons

Good news: Ellen Drews is joining us for another gardening tutorial! Last spring, Ellen shared her DIY container gardening technique (pictured below). Today, she’s going to teach us how to start our own seeds in egg cartons! Have you ever done something like this before? I can’t wait to give it a try!

Before we get to her wonderful post, I did want to take a second to let you all know that Anne and I leave for Greece tomorrow! (Follow me on Instagram to see some pictures of our trip.) We will be home in three weeks, and I’ll be back to blogging in late July with more projects, recipes, and some pictures from our trip. I’ve got an exciting collaboration and giveaway coming your way later this summer!

Without further ado, Ellen:

As a backyard vegetable gardener in Somerville, Massachusetts, I am always cooking up ways to feed my gardening addiction on a tight budget. I love finding ways to use recycled materials to grow my vegetables safely in the city. This year in my container garden, I decided to see the process from start to finish. I was going to start my own seeds in my own DIY greenhouses: egg cartons!

Starting seeds indoors is an important concept for vegetable gardening. There are some vegetables that prefer to grow right where they’re planted (i.e. cold-tolerant plants like spinach, or delicate root-crops like carrots). For these crops, I put seeds directly into my container garden as soon as the soil has thawed.

Other plants must be started indoors and then transplanted to the outdoor garden as seedlings, such as tomatoes, peppers, eggplant, and basil. These warm-season crops evolved in hot climates with longer growing seasons and so they have a long, leisurely lifespan. Where I live in New England, we can have frosts as late as Memorial Day, which would most likely kill a seedling before it had a chance to bear any fruit—the ultimate prize of the tomato plant. Starting tomato seedlings indoors as early as April allows you to get your plants going so they will reach fruiting maturity by midsummer.

Seedlings are available for purchase at farmers’ markets, grocery and hardware stores, and big-box stores like K-Mart. However, there are awesome benefits to starting from seeds:

  • Choose varieties! There are thousands of beautiful heirloom seeds out there and many cool ones are available through seed companies with the mission of saving these varieties (Seed Savers Exchange, Hudson Valley Seed Library, High Mowing Organic Seeds, and Baker Creek Heirloom Seeds are some of my favorites).
  • Save money on fancy organic seedlings and use the seeds you already have. I’m still using seeds that I bought or traded two years ago (with proper storage, seeds can last up to 5 years).
  • Avoid the pitfalls of buying cheaper, mass-distributed seedlings at stores like Home Depot and K-Mart. Devastating diseases can spread across the country via these discount seedlings. For example, in 2009, late blight on tomatoes spread across the east coast because many people bought tomato seedlings from K-Mart, Walmart, and Lowe’s—all of which carried a fungus originating in a handful of greenhouses in Alabama. (Read one article about it here.)

So, now that you’re convinced that starting your own seedlings at home is a good idea, I’ll show you how I started mine this year!

Starting Seeds in Recycled Egg Cartons

Materials:

  • Plastic or cardboard egg cartons, empty (avoid Styrofoam or heavily inked cartons)
  • Nail or awl
  • Organic potting soil or mix (Look for varieties that contain compost. You want your seeds to access as many nutrients in their little cells as possible.)
  • Seeds!
  • Spray bottle or watering can with a gentle sprinkle

Step 1: Using the nail or awl, punch three holes in the bottom of each egg cell to allow excess water to drain.

Step 2: Fill the egg carton cells with the potting soil. Use your fingers to gently press divots into each cell and re-fill the divots with more potting soil. You want to give your seeds as much material in each cell as possible without compacting the soil. For many weeks, the nutrients in the soil will be all they will get so you’ll want to fill ‘em up!

Step 3: Put 1-2 seeds in each cell, following the directions on the seed packet for how deep to put them (it will be under “seed depth”). Cover with a light topping of potting soil.

Step 4: Soak the cells with water using a spray bottle or a gentle sprinkle of water. You want water to drip out of the holes at the bottom of the egg carton to ensure that you have really soaked all the soil. BUT you also want to be careful that you don’t dislodge the seeds or compact the soil so it’s important to be gentle when watering!

Step 5: Place egg carton seed-trays indoors in a sunny window or under grow lights. Seeds should germinate in about a week! I also got fancy and used the lid of the egg carton to create a greenhouse effect over my seeds. The plastic roof kept moisture in and trapped some heat from the sun. I also punched holes in this “greenhouse” roof to keep things from getting way too humid in there.

Here’s what my tomatoes and tomatillos looked like after they grew up a bit! Now that it’s June, it’s a bit late for starting tomatoes, peppers, and eggplant like I did here, but it is a great time to start seeds for fall crops such as broccoli, cabbage, collard greens, chard, fennel and kale.

And here’s what my garden looks like today!

Leave a comment if you’ve found other ways to use recycled materials in your garden!

Note: All photos were taken by Ellen Drews.

A Peaceful Abode In Brooklyn

One of my favorite things to read about on design and craft blogs is interior design. I am so interested in learning about how people live, and different ways to create a space that is simultaneously stylish, cozy, and inviting. One of the first times Anne and I ever hung out together, we studied for a psychology exam we drew up blueprints of our respective dorm rooms, and talked endlessly about the best furniture configurations for our spaces. I kid you not!

So, this week we are taking a closer look at my dear friends’ Brooklyn apartment. Brooklyn is special to me, and Heather and Maggie’s apartment is very much on my list of reasons why. They moved in together this past fall, and have been making their apartment a home ever since.

The photos and story below are from Heather, who is simply an all-around artist in my opinion. Her photographs do a wonderful job of capturing the tranquility and creativity that seems to flow freely from her and Maggie’s home. They are both actresses, and Heather is also a beautiful drawer, painter, writer, and baker. Her blog, See, Sort, File, is an incredible archive of her musings on daily life. (I especially like this post.) Anne calls her “a young Lorrie Moore by way of Walt Whitman.”

Below is Heather and Maggie’s story. I hope that you enjoy it, and that these two inspire you to do something creative this week!

From Heather: Maggie and I met when we were eighteen at NYU, where we both studied acting. In keeping with the nomadic New York City lifestyle, we’ve each moved six times in our eight years of living here. Sixth time’s the charm, because this past November we landed a home we both love (and our first home together!) in Bed-Stuy. These days we work as actresses and waitresses, and spend our time at home chatting endlessly, cooking, and moving the couch around. I hope to never, ever move again. (Wish me luck.)

Our new place is actually two blocks away from Maggie’s old apartment. It’s a beautiful thing to move within a neighborhood you know. Signing a lease can feel like a huge leap of faith, like opening a box that will be half full of what you ordered, and half full of something completely different (i.e. a roach problem and a crazy upstairs neighbor), so we were very happy to eliminate any possible unknowns.

We love Bed-Stuy. We’re a five-minute walk away from a yoga studio that Maggie loves, a bakery where we buy foccacia and cacio e pepe sourdough, our favorite pizza restaurant, and a bar where you can usually get a seat and can always get a good drink. It’s an area filled with people of all ages and all ethnicities, with block associations and community gardens and a YMCA. I’ve always said that Brooklyn made me love New York. This neighborhood sealed the deal.

So. Our house! Decorating this place has been all about synthesizing our design sensibilities, which actually just means going through all of our belongings and figuring out what at least one of us really, really liked. We ended up furnishing our whole place with stuff we already had. Much of our furniture is actually from parents, grandparents, or families that I babysit for (!)–hand-me-downs acquired gradually over the past four years. I think the only piece of furniture we bought upon moving was our couch.

Our apartment is on the top floor of a brownstone. It is a 1.5 bedroom, which means that we have a little extra room attached to our bedroom to use as an office and guest room. (This arrangement was a bit de facto… Neither one of us wanted to sell our bed!) Hopefully our guests like very small spaces filled with office furniture.

The thing I think about the most when setting up a living space is how I want to feel inside each room. The living room should be conducive to socializing, the bedroom should be calm and peaceful, the kitchen should be warm and convenient. That, and displaying the items that just make us feel great, are the lines of thought that have driven our space. Maggie has a blanket from her dad that we keep on the couch. We have a little radio that we basically carry from room to room. I have a desk from my parents’ house that I sit at to write. I really believe that if your space makes you feel good, then that’s all that matters.

These things make our space feel like home:

One of the wildest things about our apartment is our view. Even though we’re smack in the middle of Brooklyn, we’re high enough up to see the Manhattan skyline. The sight of the Empire State Building, which towered above our acting studio in college, made this move feel like it completed a circle. These buildings have been with us all the while, and now they continue to accompany us as we change and grow, lighting up the sky with that same strange city magic.

Heather (left) and Maggie (right)

All photos taken by Heather Thiry