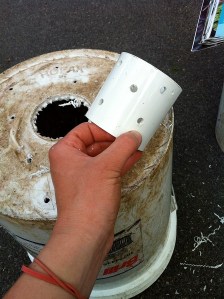
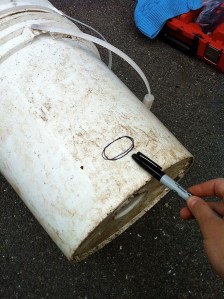
Good news: Ellen Drews is joining us for another gardening tutorial! Last spring, Ellen shared her DIY container gardening technique (pictured below). Today, she’s going to teach us how to start our own seeds in egg cartons! Have you ever done something like this before? I can’t wait to give it a try!
Before we get to her wonderful post, I did want to take a second to let you all know that Anne and I leave for Greece tomorrow! (Follow me on Instagram to see some pictures of our trip.) We will be home in three weeks, and I’ll be back to blogging in late July with more projects, recipes, and some pictures from our trip. I’ve got an exciting collaboration and giveaway coming your way later this summer!
Without further ado, Ellen:

As a backyard vegetable gardener in Somerville, Massachusetts, I am always cooking up ways to feed my gardening addiction on a tight budget. I love finding ways to use recycled materials to grow my vegetables safely in the city. This year in my container garden, I decided to see the process from start to finish. I was going to start my own seeds in my own DIY greenhouses: egg cartons!
Starting seeds indoors is an important concept for vegetable gardening. There are some vegetables that prefer to grow right where they’re planted (i.e. cold-tolerant plants like spinach, or delicate root-crops like carrots). For these crops, I put seeds directly into my container garden as soon as the soil has thawed.
Other plants must be started indoors and then transplanted to the outdoor garden as seedlings, such as tomatoes, peppers, eggplant, and basil. These warm-season crops evolved in hot climates with longer growing seasons and so they have a long, leisurely lifespan. Where I live in New England, we can have frosts as late as Memorial Day, which would most likely kill a seedling before it had a chance to bear any fruit—the ultimate prize of the tomato plant. Starting tomato seedlings indoors as early as April allows you to get your plants going so they will reach fruiting maturity by midsummer.
Seedlings are available for purchase at farmers’ markets, grocery and hardware stores, and big-box stores like K-Mart. However, there are awesome benefits to starting from seeds:
- Choose varieties! There are thousands of beautiful heirloom seeds out there and many cool ones are available through seed companies with the mission of saving these varieties (Seed Savers Exchange, Hudson Valley Seed Library, High Mowing Organic Seeds, and Baker Creek Heirloom Seeds are some of my favorites).
- Save money on fancy organic seedlings and use the seeds you already have. I’m still using seeds that I bought or traded two years ago (with proper storage, seeds can last up to 5 years).
- Avoid the pitfalls of buying cheaper, mass-distributed seedlings at stores like Home Depot and K-Mart. Devastating diseases can spread across the country via these discount seedlings. For example, in 2009, late blight on tomatoes spread across the east coast because many people bought tomato seedlings from K-Mart, Walmart, and Lowe’s—all of which carried a fungus originating in a handful of greenhouses in Alabama. (Read one article about it here.)
So, now that you’re convinced that starting your own seedlings at home is a good idea, I’ll show you how I started mine this year!
Starting Seeds in Recycled Egg Cartons
Materials:
- Plastic or cardboard egg cartons, empty (avoid Styrofoam or heavily inked cartons)
- Nail or awl
- Organic potting soil or mix (Look for varieties that contain compost. You want your seeds to access as many nutrients in their little cells as possible.)
- Seeds!
- Spray bottle or watering can with a gentle sprinkle
Step 1: Using the nail or awl, punch three holes in the bottom of each egg cell to allow excess water to drain.

Step 2: Fill the egg carton cells with the potting soil. Use your fingers to gently press divots into each cell and re-fill the divots with more potting soil. You want to give your seeds as much material in each cell as possible without compacting the soil. For many weeks, the nutrients in the soil will be all they will get so you’ll want to fill ‘em up!

Step 3: Put 1-2 seeds in each cell, following the directions on the seed packet for how deep to put them (it will be under “seed depth”). Cover with a light topping of potting soil.

Step 4: Soak the cells with water using a spray bottle or a gentle sprinkle of water. You want water to drip out of the holes at the bottom of the egg carton to ensure that you have really soaked all the soil. BUT you also want to be careful that you don’t dislodge the seeds or compact the soil so it’s important to be gentle when watering!
Step 5: Place egg carton seed-trays indoors in a sunny window or under grow lights. Seeds should germinate in about a week! I also got fancy and used the lid of the egg carton to create a greenhouse effect over my seeds. The plastic roof kept moisture in and trapped some heat from the sun. I also punched holes in this “greenhouse” roof to keep things from getting way too humid in there.

Here’s what my tomatoes and tomatillos looked like after they grew up a bit! Now that it’s June, it’s a bit late for starting tomatoes, peppers, and eggplant like I did here, but it is a great time to start seeds for fall crops such as broccoli, cabbage, collard greens, chard, fennel and kale.
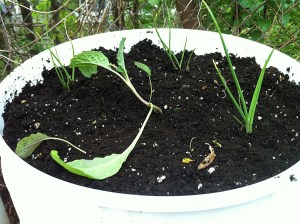
And here’s what my garden looks like today!

Leave a comment if you’ve found other ways to use recycled materials in your garden!