
DIY projects don’t always end the way I had anticipated, which is one reason why I love them so much. They force me to see things in a new way, and think up alternate routes to a final product. When I bought Sculpey clay a few months back, I thought that I’d be making a ring dish for my nightstand. Yet when it didn’t work out the way I had envisioned, I began brainstorming. What could I make instead? I tested what the clay looked like with alphabet stamps pressed into it. Much to my surprise, it worked quite nicely! My alphabet set came with a few image stamps, too — a tiny dragonfly being one of them. I quickly got to work.

DIY Dragonfly Earrings
Materials:
- Sculpey in “white”
- Tiny dragonfly stamp (or other small stamp)
- Butter knife
- Clear nail polish
- Fine round-nose micro pliers
- 2 hook ear wires
- 2 head pins
Preheat the oven to 275°. Gather a pea-sized amount of clay and roll into a ball. With a butter knife, flatten the ball onto a clean, flat surface until it is about 1/16-inch thick. Stamp the flattened clay with the dragonfly stamp. With the tip of a head pin, pierce a small hole into the top of the clay for the earring to later connect. Carefully place the earring onto a cookie sheet. Repeat for the second earring.
Bake the two earrings in the oven for approximately 7-10 minutes. When they completely cool, coat the front with clear nail polish. This will give them a nice finish. Allow them to dry for 20 minutes.
Using the pliers, bend the two ends of the wire into small loops (see finished product below). Before closing the loops completely, attach the clay and hook ear wire. Now close the circles as to avoid anything falling off.

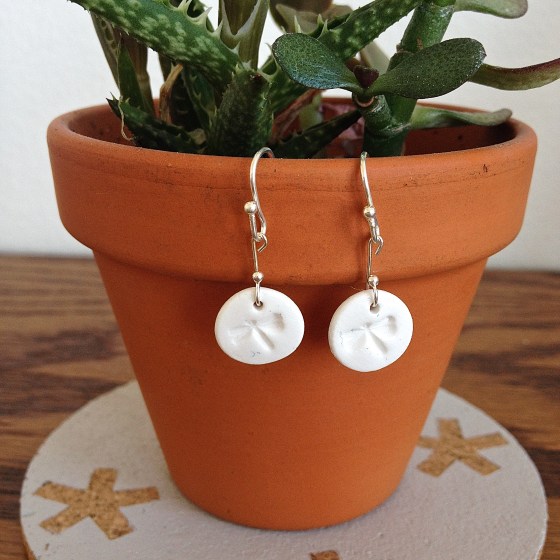
Ta da! My earrings were about a 1/3-inch wide, although any size would work (note that the baking time may vary). They are the perfect earrings for spring and summer!

Pingback: Project Roundup: Holiday Inspiration! | Scissors & Sage