Last weekend, Anne and I set up shop during the Super Bowl to make a whole bunch of valentines. Granted we like the experience of the Super Bowl (the food is clearly the best part), it’s the last thing either of us knows anything about. So we got out some of our crafting materials, splayed them out over our dining table, and had a blast together!
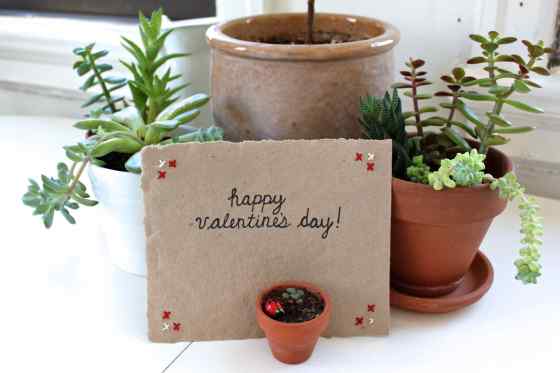
This embroidered valentine is actually one I made the following day. I knew I wanted to photograph it, and nighttime lighting wouldn’t do. Let me say this: I have never embroidered before. I would consider this DIY to be in the “easy” category, and so should you! This is a great way to dip a toe in if you’ve been thinking about trying embroidery. The supplies needed are few, so let’s go ahead and get started!

Materials:
- Thick paper
- Pencil
- Sewing needle
- White embroidery thread (about 18 inches)
- Red embroidery thread (about 24 inches)
- Scissors
- Sharpie for writing your message
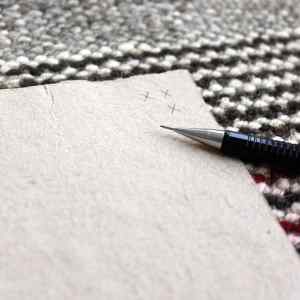
Step 1: Turn over the paper, and with a pencil mark three little Xs in each corner of the card. This simple border will ensure first-time embroidery success!
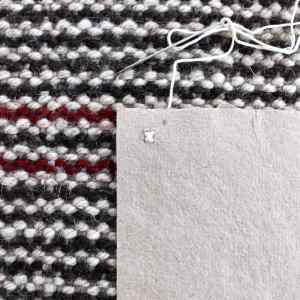
Step 2: Thread the sewing needle with white embroidery thread. Tie one small knot right near the end of the thread.

Step 3: Insert the sewing needle into the backside of the paper at one corner of an X. Pull thread all the way through until you reach the knot. Re-insert the needle into the frontside of the paper at the opposite corner of that X. From the back, sew into a third corner of the X. Finally, push the needle through the fourth and final corner of the X. Make sure the thread is taut but not too taut, as this could rip the paper. Tie another small knot on the back of the paper. Cut thread.
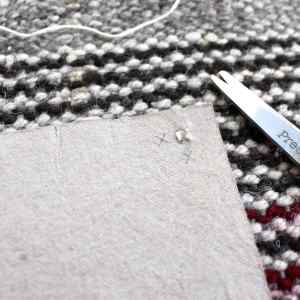
Step 4: Tie a new knot at the end of the white thread. Continue onto the next white X and repeat step 3. (My Xs got better as I continued to make them. You’ll have the art perfected by the time you finish all twelve!)

Step 5: When you have finished making the white Xs, switch to the red thread and continue until all of the Xs have been sewn. Note that I chose to take a shortcut here. Instead of making individual thread cuts for each red X, I made only one thread cut for each corner of the paper. Meaning, I sewed two red Xs together in each corner. By combining two Xs together, I saved myself both time and fuss.


Step 6: Write your message! No matter who it’s for, the recipient is going to love this handmade card. Mine is more of a postcard-style, but you could easily add some fun paper to the other side to cover the back end of the stitches. I personally like the rustic, homemade feel of it!

Some other notes:
- My particular card isn’t going in the mail. If yours is, you can easily make your own matching envelope using this technique.
- The paper I used was a perfect thickness. Anne actually made this paper a few years ago! I found that the closer I got to the edge of the paper, the more I needed to support it with my hands. That way, I could ensure the paper didn’t rip or tear.
- Have fun with it! Since you’re making the same X shape over and over again, you will soon get good and move pretty quickly. This card took me about 30 minutes.
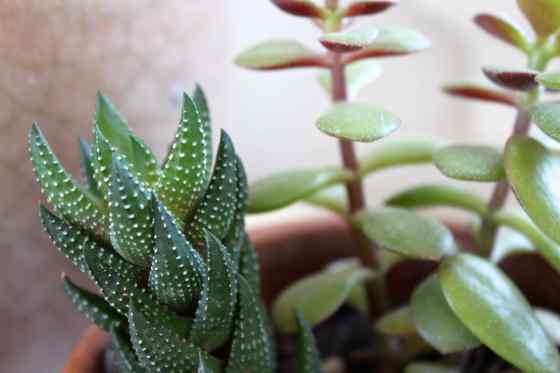
Share your own Valentine’s cards using #scissorsandsage. I may feature some of your projects on Instagram! And just because succulents photograph so well…

+Happy +++Valentines +++ adorable+
Thank you! Happy Valentine’s Day to you too! xoxo
Hi Victoria!
I have been meaning to reply for some time now. I LOVE your blog and I look forward to Monday mornings when a new Scissors and Sage is posted!
I grew up with Annie’s parents, and Janet sent me your info.
That being said, love your sweet valentines. Already have mine made for this year but now have this lovely idea squirreled away for next year!
Hello Nancy, thank you so much for stopping by! I am so glad that you like Scissors & Sage. Valentine’s are so much fun to make. All my best! Victoria
Thanks for the tutorial! I’ve been meaning to try my hand at embroidery, and this is a super cute starter project. Random question: WHERE on Earth did you find that teeny terra cotta pot?!? It is adorable, and I would love to have them for gifts (and by “gifts”, I mean “To: Me – From: Me” presents, of course) 🙂 Thanks again!
Hi Nichole, I am so glad that you like the tutorial! I actually bought that terra cotta pot at a gardening store in Philadelphia called Urban Jungle. You can find them on Amazon here: http://www.amazon.com/10-Mini-Clay-Pots-Plants/dp/B00474Z65O/ref=sr_1_1?ie=UTF8&qid=1423577536&sr=8-1&keywords=mini+terra+cotta+pot
Enjoy! -Victoria
Pinned! I have always wanted to dabble with embroidery. I eventually want to embroider my hand-lettering onto cards, if that’s even possible. I think that starting out simply is a good idea for now, though! Great tutorial, Victoria! PS – love your succulents. I have a serious addiction to them. 😉
I’m so glad you like the tutorial! Let me know how it goes! And yes to succulents — I can’t stop propagating them! -Victoria
Pingback: DIY Felt iPhone 6 Sleeve | Scissors & Sage