Birthday Cake Bunting

IMG_9808

Recently, a couple of friends and I got together to whip up a mean birthday cake for a friend’s party.  We made a chocolate-hazelnut-avocado vegan cake, and needless to say it was a show-stopper.  Although, if my Italian grandmother were to have anything to say about baking (and cooking), it would be this: “If it doesn’t look good, it doesn’t matter what it tastes like.”  Perhaps a bit severe, but I, too, believe that presentation is everything.  That’s why crafting is so fun!  I decided to make a paper bunting banner for this cake, well, just because.  It was relatively easy to make, and I was really happy with how it turned out.

Materials:

  • Tape
  • String
  • Scissors
  • Colored paper
  • Letter stickers or stamps
  • Wooden barbecue skewers

How-To:

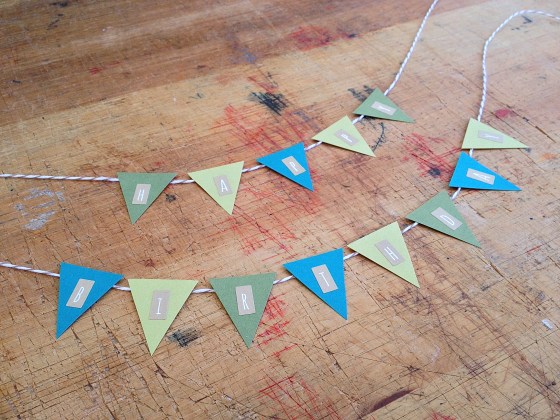
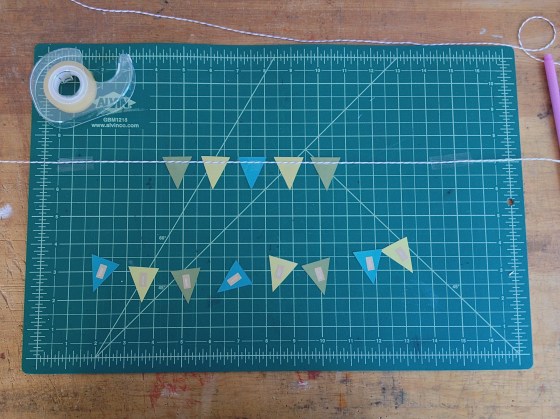
  1. Decide what you want your banner to say, and cut out the correct number of triangles (I used 13 triangles to spell “Happy Birthday”).  Then, cut two pieces of string about two feet long each.
  2. Turn the triangles over, and place the string across the back of them.  Lay down tiny pieces of tape to adhere the triangles to the string.
  3. Flip the triangles right side up, and either add letter stickers or letter stamps to the triangles.  Anne found these letter stickers from the dollar section of Target, and I love them.

IMG_9795IMG_9798

Once the banner is made, find two wooden barbecue skewers (perhaps also from Target).  Lay the skewers down on your work surface, pointy ends toward you.  Gather the ends of the bunting string and either make a knot or a bow with the string around the top end of the skewers.  It might help to also use tape to secure the string.  Hold up the finished product to make sure that the bunting doesn’t hang too low, and make any adjustments needed.  One the cake is made, stick the pointy ends of the skewers into the cake, and voila!  Just be sure that there is a bit of space between the paper bunting and the birthday candles.  That would really do you in in terms of presentation!

IMG_9800

Sharpie Easter Eggs

IMG_3577.JPG

This Easter crafting project is one that requires two things: eggs and Sharpie markers.  While dyeing eggs may be the more traditional Easter activity, sometimes there just isn’t the time.  Let’s face it that holidays require so much preparation.  Between the cooking, the baking, the cleaning, and the entertaining, things fall to the wayside.  But with this easy craft project, designing Easter eggs does not have to be one of them!  It’s a project that is great for any age, and yields some pretty neat results.

To get started, hard boil your eggs.  Once the eggs have cooled to room temperature, gather any/all of your Sharpie markers and begin designing!  You can check Pinterest or Google Images for inspiration.  These eggs would look great with seasonal words drawn on them, or they could even act as place card alternatives for your Easter dinner table.

IMG_3558_2

Which came first, the chick(en) or the egg?


Oscar Wilde Stencil Art

IMG_9779

One of my first-ever blog posts on Scissors & Sage was a stencil pillow I made.  It was my first time using a stencil for a crafting project, and I couldn’t believe what a fun and relatively simple process it was!  Months later, I made another stencil project, Mirror, Mirror, as an apartment-warming gift for my friend, Caroline.  I’ve started using stencils to craft homemade cards, too, and it works quite well!  Today, I present a project I recently finished for my uncle’s birthday.  I knew it was a quotation that he really liked, so I thought I’d give him something that he could put up in his home.  Making this stencil art is not difficult; it only requires some layout planning and a good eye!

IMG_9753

Materials:

  • Stencil pack
  • Black marker, thin enough to fit in the stencils
  • Colored paper
  • Computer paper
  • Ruler
  • Scissors
  • Pencil
  • Eraser

The first step is to choose a quotation.  Then, use computer paper to sketch out the individual words and design you want.  This took some trial and error, as I wasn’t sure how I wanted the words to fit together.  I decided to cut up the computer paper so I could move the words around individually.  Once you have the layout you want, get the colored paper ready and place the rough draft above it, like this:

IMG_9757

That way, there will be a guide to show you where to place each letter.  (I really don’t like it when things aren’t centered, so this helps to avoid that!)  Continue stenciling each word.  When you finish, fill in the stencil gaps in letters like “B” and “U” by hand.

IMG_9763IMG_9782

The project is complete!  Finish it off with a frame or tack it to a cork board.  My project is happily framed at my uncle’s house.  What are some other ways to use stenciling?  Happy crafting!

Protein Bites

IMG_9950

Last week, Anne and I went on a road trip to The South.  Stops included: Durham, Charleston, Savannah, and Asheville (city guides to come!).  Now, I love road trips.  I would probably choose them over flying.  I love them for the playlists, the beautiful scenery, the license plate game, the old-timey feel, and the snacks.  For this trip, I decided to make a healthy snack option for the car ride.  These little fellows are tasty and chock full of good-for-you ingredients, and they will fill you until your next meal.  Protein bites are a no-bake snack that could even work at home.  Just keep them in the fridge (up to two weeks), and enjoy one during that dangerous pre-dinnertime window.

Protein Bites

Prep time: 15 minutes | Inactive time: 30 minutes | Yields: 15 bites

Ingredients:

  • 1/4 cup whole almonds
  • 1/2 cup quick oats
  • 1/2 cup dried cranberries
  • 5 dried apricots
  • 1 tbs honey
  • 1/2 cup peanut butter
  • 1/4 cup mini chocolate chips
  • 1 cup shredded coconut

In a food processor, grind the shredded coconut until powdery.  Set aside in a small bowl.  Grind almonds in the food processor.  Add in the oats and pulse together.  Then, add cranberries and apricots.  Grind these ingredients together and transfer to a medium bowl.

In the same medium bowl, add in honey, peanut butter, and chocolate chips.  Combine these ingredients by hand until blended.

Roll the dough into bite-sized balls and place on a cookie sheet.  Transfer into the freezer for 30 minutes.

Remove bites from the freezer and roll balls in  the powdered coconut until covered.  Place protein bites in a plastic container, separating them from one another with paper muffin cups.  Keep refrigerated while home, or in a cooler bag while on the road.

*These ingredients can be altered for dietary restrictions or personal taste.  Some examples: different types of dried fruit, almond butter, whey protein powder, etc.  They will be delicious regardless!  Enjoy!

From Scissors & Sage

IMG_9922 IMG_9928 IMG_9933 IMG_0027

Victoria’s Spring Essentials

IMG_9992

Spring has practically-almost-maybe arrived, and I couldn’t be more excited.  While I really enjoyed the winter season this year, I am certainly ready to see it go.  Today, Anne and I are leaving for a spring break road trip for nine days.  Yippee!  So, with spring on my mind, I’ve put together some of my essentials for this upcoming season.

IMG_9986IMG_9987IMG_9994IMG_9990

Ray Ban Sunglasses: Any type of sunglasses add a twist to a spring outfit.  Wear them, hook them onto a t-shirt, or use them as a headband.  Get them here.

Made With Love: These bracelets were a lovely birthday gift from a friend last year.  They make such a statement, whether you wear just one or all eighteen together.  They are made from recycled rubber, and they come in all sorts of colors!  Get them here.

Hair Clips: An alligator clip is always clamped onto either my backpack or my purse.  They get hair out of your face in an instant, and look more professional than regular old hair elastics.  Get them here.

Aveda Hand Lotion: I don’t know about you, but the end of winter does not mean the end of dry skin for me.  I almost always keep a small bottle of lotion on me, and Aveda does the trick.  Thanks, Mom!  Get it here.

Clutch: Anne bought me this Anne Klein clutch this past Christmas.  Lemony-lime yellow is a popular color right now, and it’s easy to match with many of my outfits.  It’s perfect for a night out on the town.  This particular bag was from Marshalls.

Bird Ring: This ring is from one of my favorite jewelry stores, Silverado.  The bird image was adapted from a temple screen found in Thailand.  One reason I love it so much is because of the statement it makes–I ditch all other jewelry when wearing this ring!  These birds remind me that spring is on the way.

Hair Pins: These polka dotted hair clips make for a great hair accessory.  Jane Tran makes many cute styles–I have a few!  Get them here.

Lip Gloss & Lipstick: I’ve been challenging myself to wear bold lip gloss and lipstick recently.  There’s something about a red lipstick that changes an entire outfit.  During the day I’ve been wearing Burt’s Bees Rose for something a bit subtler, and Wet n Wild Cherry Frost on nights out.  Get them here and here.

Timex Watch: Another statement piece.  I’m all about minimal jewelry that speaks loudly come springtime.  This watch from Kohl’s was on mega sale, and it has definitely become one of my go-to accessories.  Thanks, Dad!

Essie Nail Polish: Essie is my favorite nail polish brand.  This past year, I have been giving myself manicures rather than spending money at a salon.  I’ve started a little Essie collection of six or so nail polishes.  These two are called Mint Candy Apple and Imported Bubbly.  Get them here and here.

Happy spring, everyone!  Do you have any of these items?  What’s in your spring essentials collection?