Christmas Wood Carvings

One of my favorite things about the holiday season is the traditions, both old and new, that come along with it.  This week’s post features the handiwork of my dad, Sal.  Every year, he embarks on a new wood carving project, either making a Christmas gift for a loved one, or simply adding to his own ornament collection.

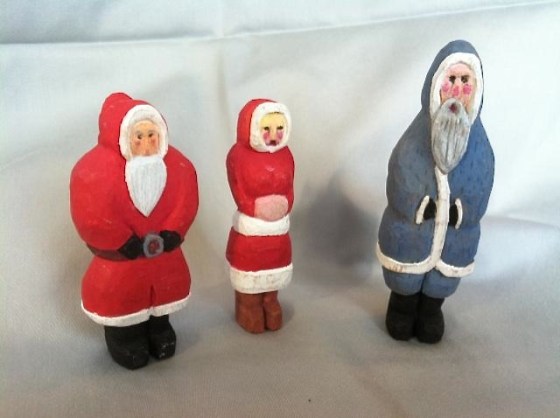
There he is every year, whittling away after breakfast or while watching a television show.  He says it is therapeutic, and I can understand why.  His wood blocks turn into santas, snowmen, North Pole people, and others of the like.  Some carvings become ornaments, and others are stand-alone decorative pieces.

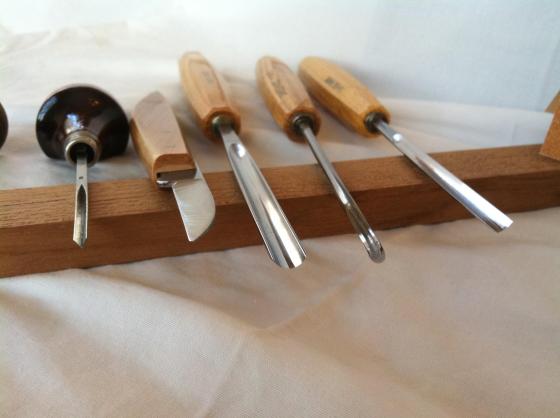
The type of wood that he uses is a hard wood called basswood.  His tool collection consists of chisels, gougers, and scoopers of many shapes and sizes (i.e. “v” shape, regular blade, curved scooper, etc).  Most importantly, he shared, his tools are very sharp.

                                  Before carving, he makes a pencil sketch on the block of basswood.  As he whittles away, he continuously re-sketches in order to keep the image on the wood.  Carving away from a block of wood proves challenging in that it is not possible to put back any wood: work slowly and diligently, and take off small amounts at a time.  After he finishes carving, he uses fine grit sandpaper (around 400) to take off any rough edges on the face, cheeks, or hat.  The final step is to use blends of acrylic paints to bring the piece to life.For pieces that become ornaments, he screws an eye hook into its top and uses thread to hang it on the Christmas tree.  These wood carvings are true works of art, and I look forward to seeing his toolbox come out every holiday season.  His creativity broadens each year (see the violin snowman below), and it is always a surprise as to what he will make next!
                                   Note: All photographs taken by Sal.

I’m on Pinterest!

Good news!  I’ve recently been updating my Pinterest, and I am excited to share it with you here today!  Above is a sneak peak of some images I’m loving right now, but head on over to my boards to see what else I’ve been enjoying.  A few of my boards include: home decorating ideas, fashion, crafting projects, recipes, and even a board just for cute dogs.

In the coming weeks, I’ll be updating my Pinterest with more ideas for holiday crafts, recipes, and winter fashion.  When it comes time for me to begin my own holiday elfing, I’ll be sure to fill you in on the details here!  Until then, put on some holiday music (101.1 FM, for those of you in Philly) browse my Pinterest boards, and enjoy the crafting spirit!

Note: All images are taken from http://www.pinterest.com.

Mirror, Mirror

Ever wake up in the morning and stumble into the bathroom with one eye still closed and a bird’s nest for a head of hair?  Well, this happens to me often.  I reach for my glasses, and examine the day ahead of me.  My outlook on life come 7 a.m.  is not always the brightest, but all that changed this past summer.Anne and I went on a two-week road trip from Philadelphia, PA to Chicago, IL, with many stops along the way.  We stayed in a hip hostel in Ohio City, Cleveland’s artisan neighborhood.  (This was one of our most favorite places, but that’s a whole other story!)  And in our bathroom that day was a framed “YOU LOOK GREAT” message hanging opposite the medicine cabinet.  My heart leapt with joy!This message was a little blessing to read come morning.  While it is written backwards, it appears correctly when looking at it via the bathroom mirror.  Genius?  I think so.  No wonder Da Vinci used this method!Creating this self-esteem-boosting message (or one similar to it) is very simple!  Once you have gotten your papers and markers picked out, flip your stencil so that its front face is touching the paper.  All you need to remember is to write the individual words backwards, too.  For example: “YOU LOOK GREAT” will be spelled “UOY KOOL TAERG.”  Got it?!  The last step is to find a picture frame.  I used a black 5 x 7 frame from Blick.I made this particular sign as an apartment-warming gift for my dear friend Caroline.  Its versatility makes it a great gift idea, or even just another way to spruce up your own bathroom.

What’s a phrase that you would want to read one-eyed in the morning?

Note: All photos were taken by Caroline Wurtzel.  Check out her graphic design work here!

Make Your Own Scrabble

Who doesn’t love a good game of Scrabble?  I sure do!  I’ve taken Scrabble playing to a whole new level by making my own game board from scratch!  That’s right.  From decorative paper and cardboard.  It was one of my most lengthy projects, but it was worth every minute.I took a few bookmaking classes during college, and applied what I learned to this project!  Upon completing these classes, I somehow left with what were the makings for a clamshell box.  Everything was pre-cut, and I knew I had to construct something on my own.  Would I have the skills to do it all by myself?  What would happen if I made a grave mathematical error?  (These really do exist in bookmaking.)I decided to go for it.  I purchased a Scrabble game from a tag sale for $1.50, and took the pieces I would need: wooden tiles and two tile holders.  The tile pouch is courtesy of Anthropologie’s gift wrapping, and I found the cloth for the “board” while I was studying abroad in Ghana.  My final detail went into wrapping the pencil in the same decorative paper as the rest of the box.  I used spray glue to adhere the paper, which allowed the pencil and paper duo to be sharpened beautifully together.Have you ever made a game of your own?  Leave a comment if you have any questions!

Ode to Adrienne Rich

When my girlfriend, Anne, and I moved in together, it was late summer 2012.  We were moving to Philadelphia from different cities for graduate school, and it was an exciting and hectic time to say the least!  We found a beautiful apartment amidst the hustle and bustle of Center City.  Hardwood floors.  Built-in bookshelves.  We were ecstatic!

I knew that I wanted to surprise her with a homemade housewarming gift – something that captured this important moment in our lives.  When I found this quote by Adrienne Rich, I knew that something had to be done!  I was inspired by a stencil pillow from Wit & Whistle.

Here is a list of some supplies & tips:

  • As an Etsy advocate, I decided on this linen pillow cover.  I used a pillow insert that I already had, which saved a lot of money!
  • I purchased a black Pebeo Setaskrib marker from Dick Blick, and stencil from Amazon.
  • Before getting started, I mapped the project out on a piece of paper to get a sense of the layout that was needed.
  • Keep a piece of cardboard inside of the pillow while you work in order to avoid any bleeding from the marker.

This stencil pillow was a big success, and it is something that Anne and I both look at every day.  It is a reminder that we are always learning.  Happy crafting!