Mirror, Mirror: Part Two

Last year, I made my friend Caroline an apartment-warming gift for her move to The Big Apple.  It was a framed sign that read, “YOU LOOK GREAT” when read via the bathroom mirror.  When not read through the bathroom mirror, the DaVinci-style message appears to be written in reverse and with mirror-image letters.  The trick is to hang it on a wall directly opposite the mirror so that you can read it when you’re brushing your teeth or getting ready to go out.  It can be a nice way to counteract self-criticisms.

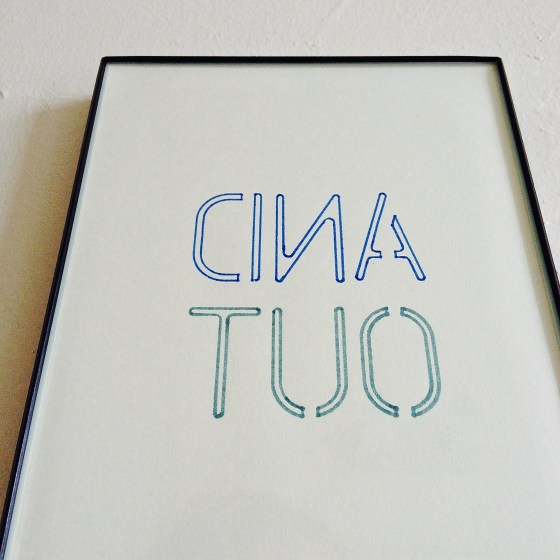
I’ve been thinking about ways to spruce up our own bathroom recently, and recalled this project.  I got to thinking that I kind of wanted one, too.  We have a wall in our bathroom about 3-4 feet from the mirror, so it was perfect for a similar sign.  I wanted it to be subtle and unique, and quickly settled on “INSIDE AND OUT.”  (As in: “You are beautiful, inside and out.”)

The steps for this project are almost identical to my first Mirror, Mirror sign.  Read up on how to make either of them here.  There are, however, two differences in this one.  First, the two frames need to be far enough apart on the wall so that your head fits between them when looking in the mirror.  They may look oddly far apart on the wall at first, but it’s worth it when you or your house guests discover the secret message!  Second, the frames need to be hung in reverse order.  When looking directly at the wall, the left frame must read “AND OUT” and the right frame must read “INSIDE.”  Capiche?

What would you write in your own secret bathroom sign?  Leave your response in the comments section below!

Father’s Day Card Crafting

IMG_1311

Looking for a last minute Father’s Day card?  I made this card fort my dad in under 15 minutes, and he loved it!  There isn’t much to it.  I cut up a few pieces of colored paper in the shape of a popsicle (I wasn’t neat and tidy about perfect lines — on purpose!).  Next, I glued the paper down and then hand-wrote the words in a few different fonts.  I got this card idea from Paper Source, as I often like to do.  This card could even be used for a dad or grandpa whose birthday is in the summer!

IMG_1310 IMG_1314Happy Father’s Day!

Mother’s Day Card Crafting

IMG_3794

With Mother’s Day around the corner, I thought I’d share a card I made for my mom last year.  I tried to think outside of the box on this one, adding dimension with the twine and paper banner.  When I was little, I spent a lot of time picking wildflowers from the front yard, making tiny bouquets for my mom.  I wanted to remind her of those days with this card!

But do you want to know the secret “ingredient”?  I stamped the wildflowers with BRUSSELS SPROUTS!  It worked like magic.  All I had to do was cut the sprouts in half and dab them in an ink pad.  I stamped the yellow flowers first, and then the purple.  Next, I adhered the twine with Elmer’s glue.  The last step was to cut out a paper banner to write “happy mother’s day” on.  I decided to make a matching envelope, so I added a white circular sticker and stamped a few more wildflowers on the label.

Who knew you could find a creative use for Brussels sprouts?  I wonder what else is hiding in my refrigerator…

IMG_3786 IMG_3789

Oscar Wilde Stencil Art

IMG_9779

One of my first-ever blog posts on Scissors & Sage was a stencil pillow I made.  It was my first time using a stencil for a crafting project, and I couldn’t believe what a fun and relatively simple process it was!  Months later, I made another stencil project, Mirror, Mirror, as an apartment-warming gift for my friend, Caroline.  I’ve started using stencils to craft homemade cards, too, and it works quite well!  Today, I present a project I recently finished for my uncle’s birthday.  I knew it was a quotation that he really liked, so I thought I’d give him something that he could put up in his home.  Making this stencil art is not difficult; it only requires some layout planning and a good eye!

IMG_9753

Materials:

  • Stencil pack
  • Black marker, thin enough to fit in the stencils
  • Colored paper
  • Computer paper
  • Ruler
  • Scissors
  • Pencil
  • Eraser

The first step is to choose a quotation.  Then, use computer paper to sketch out the individual words and design you want.  This took some trial and error, as I wasn’t sure how I wanted the words to fit together.  I decided to cut up the computer paper so I could move the words around individually.  Once you have the layout you want, get the colored paper ready and place the rough draft above it, like this:

IMG_9757

That way, there will be a guide to show you where to place each letter.  (I really don’t like it when things aren’t centered, so this helps to avoid that!)  Continue stenciling each word.  When you finish, fill in the stencil gaps in letters like “B” and “U” by hand.

IMG_9763IMG_9782

The project is complete!  Finish it off with a frame or tack it to a cork board.  My project is happily framed at my uncle’s house.  What are some other ways to use stenciling?  Happy crafting!

March is National Craft Month!

Did you know that crafting gets an entire national month to itself?  I didn’t.  According to the Craft & Hobby Association (which I also didn’t know existed), March is National Craft Month. This was the best news I heard all week!  The CHA has a very handy downloadable  calendar and tips sheet with ideas on how to participate in a creative month of crafting.  Be sure to also check out the Do It Yourself section of Scissors & Sage!

Cre8time.org and #cre8time are ways in which you can become involved in National Craft Month.  As stated in their slogan, “Reclaim your creativity,” #cre8time is all about taking time to work on projects that might be living at the bottom of every to-do list that you write.  Maybe this means you will #cre8time for cooking more often, or hand-writing a letter to a friend.  It could even mean taking time to grow a few indoor plants with the changing season.

For this project, I enlisted the help of fellow Creative Arts Therapy friends.  As graduate students, we easily lose sight of the beauty in our artistic mediums (art, music, and dance/movement).  My hope for this project was to spread awareness about the importance of establishing time for crafting and creating, especially for those who greatly value this practice.  Exercising our creativity juices is what keeps our batteries (mostly) charged!

What will you #cre8time for this month?

Note: Click images to view in slideshow.