Knitted Neck Warmer

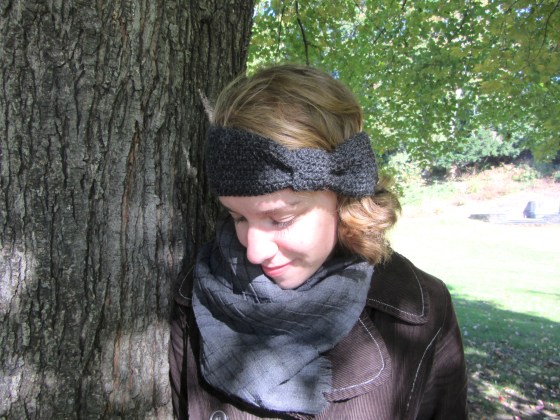
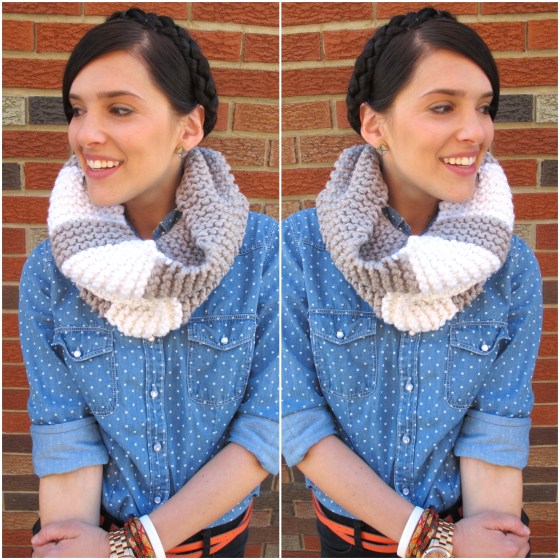
The gift giving season took on a whole new meaning for me this year.  Learning to knit again has been such a fun experience these past few months, and I can’t seem to get enough of it.  I knit my sister, Elisabeth, a neck warmer to keep her cozy during these cold months.  Rather than knitting a looser and longer scarf, this accessory sits (somewhat) snugly around her neck.  The the yarn color I chose, Berry Pie Mix, complements her wonderfully wild and curly brown hair.

The Materials:

How-To:

  1. Cast on 25 stitches.
  2. Garter stitch for as many rows as needed to fit over your head.
  3. Bind off, leaving a three-foot tail of yarn for sewing.
  4. This pattern calls for a special twist at the end.  Here is a picture tutorial of how to create this:

This is a versatile accessory that could be worn in the fall, winter, and even early spring.  Choose a yarn color for a loved one and whip one of these up in no time for an upcoming birthday or Valentine’s Day!

Note: Pattern by Judy.

Christmas Wood Carvings

One of my favorite things about the holiday season is the traditions, both old and new, that come along with it.  This week’s post features the handiwork of my dad, Sal.  Every year, he embarks on a new wood carving project, either making a Christmas gift for a loved one, or simply adding to his own ornament collection.

There he is every year, whittling away after breakfast or while watching a television show.  He says it is therapeutic, and I can understand why.  His wood blocks turn into santas, snowmen, North Pole people, and others of the like.  Some carvings become ornaments, and others are stand-alone decorative pieces.

The type of wood that he uses is a hard wood called basswood.  His tool collection consists of chisels, gougers, and scoopers of many shapes and sizes (i.e. “v” shape, regular blade, curved scooper, etc).  Most importantly, he shared, his tools are very sharp.

                                  Before carving, he makes a pencil sketch on the block of basswood.  As he whittles away, he continuously re-sketches in order to keep the image on the wood.  Carving away from a block of wood proves challenging in that it is not possible to put back any wood: work slowly and diligently, and take off small amounts at a time.  After he finishes carving, he uses fine grit sandpaper (around 400) to take off any rough edges on the face, cheeks, or hat.  The final step is to use blends of acrylic paints to bring the piece to life.For pieces that become ornaments, he screws an eye hook into its top and uses thread to hang it on the Christmas tree.  These wood carvings are true works of art, and I look forward to seeing his toolbox come out every holiday season.  His creativity broadens each year (see the violin snowman below), and it is always a surprise as to what he will make next!
                                   Note: All photographs taken by Sal.

Special Edition: Holiday Playlist

Get your cheer on with this holiday mix!  Listen on the go, while you’re at work, or when you’re writing up those last few Christmas cards.  (Or let’s be real, when you start writing up those Christmas cards.)  This mix is has some oldies (see: Chuck Berry) and some goodies (see: Sufjan Stevens).  Let me know what you think.  I hope to create more seasonal mixes in the future!

“It’s Coming On Christmas”

  1. Merry Christmas Baby – Otis Redding
  2. Christmas (Comes But Once A Year) – Amos Milburn
  3. Run Rudolph Run – Chuck Berry
  4. Jingle Bells – Frank Sinatra
  5. Sh-Boom – The Chords
  6. Just Like Christmas – Low
  7. Ooh La La – The Faces
  8. All That I Want – The Weepies
  9. Ring Them Bells – Sufjan Stevens
  10. River – Joni Mitchell

Ear Warmer Headband

I recently finished my second knitting project of the season: an ear warmer headband for my mom’s birthday!  It was a fun project because I was able to try out a new stitch and create my own pattern based on styles I saw online.  Before I gave it to my mom, I snapped a few pictures of the final product.The name of the stitch I used here is the seed stitch.  It is a most magnificent stitch that I will certainly use for future knitting projects.  It is so delicate and beautiful!  Once again, Knitting Tips By Judy helped me learn and become comfortable with my knitting skills.  The trick to using the seed stitch is to cast on an odd number of stitches.  Here are my own step-by-step directions:

What You’ll Need:

  • 1 skein of yarn (I used 50% wool/50% alpaca in charcoal grey)
  • Size 8 knitting needles
  • Hand sewing needle
  • Scissors

How-To:

  1. Cast on 15 stitches
  2. Alternate every stitch: knit-purl-knit-purl-etc.
  3. Make sure you start and end every row with a knit stitch
  4. Continue knitting until the headband fits comfortably around your head
  5. Cast off and sew in the yarn ends
  6. Whipstitch the headband closed
  7. For the small band, cast on 15 stitches and knit about 10 rows
  8. Cast off, sew in the yarn ends, and whipstitch the band closed around the ear warmer headband (this will produce the pleated look)
  9. Put it on and ENJOY!

For those of you who are looking to tidy up your own yarn collection, here is one way to do so.  I’ve started collecting toilet paper tubes to wind my yarn!


Have questions?  Any suggestions for future projects?  Leave a comment!

Cowl Me Crazy

‘Tis the season for all things cozy, so why not ring in this beautiful fall weather with a knit cowl scarf?  I haven’t picked up knitting needles in many years, so I thought I’d give it a go.  My grandma taught me how to knit when I was in elementary school, and it was something that we did together most days.  Granted I couldn’t knit a straight line for the life of me, but it was the time we spent together that was especially important.

This time around, I had to resort to another mode of learning how to knit again: YouTube.  Miracles do happen, folks!  One woman named Judy acted as my Knitting Fairy Godmother.  Her step-by-step instructional videos were incredibly helpful, and she is even a knitter to the stars.  (But really.)

The model in this post is my dear friend and fellow creative arts therapy student, Jacklin!

My girlfriend surprised me for my birthday with some of the above knitting tools and a gift certificate to a local yarn store, Loop.  I quickly went to check out the options and choose my yarn colors!  Here is a list of the supplies you’ll need for your very own cowl scarf:

  • Three skeins of Spud & Chloe Outer yarn.  I used two of Rhino & one of Snow Day.
  • Size 13 needles (9 mm)
  • Hand sewing needle
  • Knitting needle stoppers
  • Stitch counter
  • Scissors

My inspiration for making this scarf came from another blogger’s Katy Cowl.  I used her free pattern as a starting point for my project.

Here are my own step-by-step instructions on how to make my striped Cowl Me Crazy scarf.

  • Cast on 30 stitches of Rhino
  • Garter stitch for 28 rows
  • Change color to Snow Day and garter stitch for 14 rows
  • Change color to Rhino and garter stitch for 8 rows
  • Again, switch to Snow Day for 14 rows
  • Finish with 46 rows of Rhino
  • Bind off
  • Weave in all the loose ends from changing colors
  • Whipstitch the ends of the scarf closed in order to make a circle!

Happy knitting!