Today’s blog post comes from a dear friend, Ellen Drews. Ellen is a banjo-playing, bug-loving, and plant-praising kind of gal. She has recently moved to the Boston area, and has hit the ground running managing several community gardens. From Ellen:
As a resident of densely-populated Somerville, Massachusetts, and a manager of three community gardens in Lowell, I have been putting a lot of brain power towards the challenge of growing delicious, seasonal vegetables in places with contaminated soil—or no soil at all! In my opinion, no one should have to pass up the fun and tasty rewards of vegetable gardening just for lack of workable land. So why not grow food above the land—in containers! Well, that’s what I did in the parking area behind my apartment. And my landlord keeps telling me he can’t wait until “we” are reaping the bounty. I guess he’s expecting me to share.

Container gardening offers many benefits: soil in containers warms up earlier in the spring, so you can plant those heat-loving tomatoes, peppers, and basil a bit earlier than you could in the ground. Containers can be put in locations with ideal sun exposure. And containers offer less territory for weeds and pests to take up residence—often resulting in healthier plants.
There are also a couple of limitations that container gardening brings that are important to be aware of:
- Vegetables grown in containers cannot spread their roots very far to find the perfect mix of nutrients in the surrounding soil. Everything they need must be present right there in that compact space. Therefore, it’s necessary to fertilize your containers a few times during the growing season with yummy compost or organic fertilizers.
- Soil in containers dries out easily, especially if the container has the proper drainage it needs to avoid root fungus. Dry soil is of no use to a growing plant—the plant requires water to exchange nutrients at the roots. What’s more, if a young vegetable seedling goes through the stresses of repeated “droughts” or under-watering, it will never reach its full potential!
But some of us have day jobs—so how can we keep our containers at the perfect, constant moisture level without running outside to water them every few hours? Easy! Build self-watering containers.
Self-watering containers are somewhat misnamed. They don’t water themselves infinitely—you will still have to go out and water your plants every couple days to every day on hot, dry days. However, wicking action will draw water through the soil from a reservoir below and will reduce major moisture fluctuations in the container. Your job is to make sure that the reservoir always has some water in it, and the container will do the rest! You can buy self-watering planters, but DIY containers are easy to make and much cheaper.
Self-Watering Container Garden
Materials:
- 2 five-gallon food-grade plastic buckets (available at hardware stores, or for free at many restaurants!)
- 4-6” piece of PVC pipe or PVC fence post
- Drill and drill bits (1/4” bits work best – anything on the larger side is good for making drainage holes)
- X-acto knife or sharp clippers
- Sharpie marker
- Organic potting soil (if it contains compost, great! If not, get some granular fertilizer like PRO-GRO to mix in for nutrients. I used Coast of Maine organic container soil.)
- Seeds or seedlings of your favorite veggies (look for varieties like “compact” or “bush”)
What to do:
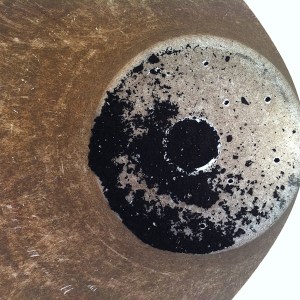
- Start with one bucket—this one will be nested inside the other, and will hold the soil and your plants. Turn it over and use the drill to cut out a big circle in the bottom of the bucket. You may need to use the X-acto knife or clippers to fully punch out this circle.
- Then, drill about a dozen “air holes” randomly throughout the bottom of the bucket. These holes will allow air to penetrate the soil and will drain excess water into the reservoir bucket below.
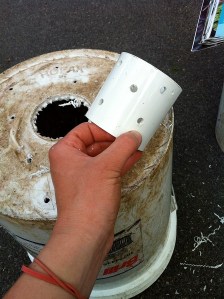
- The piece of PVC pipe or fence post will serve as a “spacer” between the two buckets, holding them apart and also forming the “wick” part of the container where garden soil comes in contact with the water in the reservoir. Drill several holes throughout the PVC spacer, making sure that about 4-5 of the holes are within a 1/4” from the bottom edge of the spacer. This way, it will be able to draw water, even if the reservoir level is fairly low.
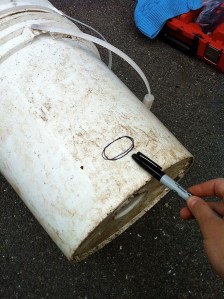
- Position the spacer in the middle of the second (hole-free) bucket and nest the other bucket on top of the spacer. Mark where the bottom edge of the inner bucket reaches with a Sharpie on the outer bucket. Drill out a hole that meets the edge of the inner bucket about 2” across and 1” tall. This will be your access point for re-filling the reservoir and for checking the water level with a finger!
- Remove the inner bucket and fill the PVC spacer with potting soil. Pack it gently to remove any large air pockets, but don’t compress the soil too tightly. The spaces between the soil particles will allow water to wick through the spacer and up into the soil of the inner container.
- Nest the inner bucket over the spacer so that the circular hole in the bottom lines up with the PVC spacer. Fill the inner bucket with potting soil. The soil inside the bucket should be making direct contact with the soil in the spacer, so that it forms a continuous wick throughout the bucket. Fill to within an inch of the top rim of the bucket—you want your plants to have as much soil as possible in the limited space so don’t skimp out on filling up the bucket.

- Water the soil until it starts to drain into the reservoir below, then fill the reservoir using the side access hole in the bottom bucket. Now you are ready to tuck in some seeds or some seedlings and watch them grow!
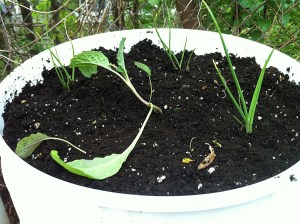
I’m growing kale and scallions in one self-watering container, and I’ll put a tomato plant into the other container, now that we’ve passed the last frost date for Boston. I’ve also got beets, arugula, lettuce, and nasturtiums growing in other found containers like a milk crate and a Coca Cola rack. What else can you turn into a container for gardening? -Ellen (with a slug)

Note: All photos were taken by Ellen Drews.