Mouth-Watering Chocolate Mousse

Let’s be honest here for a minute.  Chocolate mousse is the sexy lingerie of desserts.  Its smooth, light texture only leaves you wanting more.  Its simplicity is mind-blowing.  One taste and you’re hooked!  This Valentine’s Day, Anne and I decided to forego a dinner reservation in favor of a home-cooked meal.  I knew I wanted to make a special dessert to complement our dinner menu, so I decided to seize the moment and learn how to make this celestial delicacy.

Up until a few weeks ago, I had never baked with a mixer.  What did I do when a recipe called for one?  I bulked up my arm muscles and it usually turned out the same as if I had used a mixer.  I’d give myself a pat on the back and move forward.  Recently, something in me changed, and I realized that there were just some things I couldn’t make without a mixer–chocolate mousse certainly being one.  Now I am the proud owner of a hand-mixer! Anne and I are mixing this and mixing that, happy as clams.  (See: egg whites below.)

After scouring the Internet for the perfect mousse, I decided on a recipe from Bobby Flay.  Its minimal ingredients and rave reviews had me sold.  I adapted a few ingredients and steps, so I present to you my official recipe below.

Mouth-Watering Chocolate Mousse (adapted from Bobby Flay)

Prep time: 20 minutes | Fridge time: 1+ hour | Yields: 4-6 servings

Ingredients:

  • 6 oz semi-sweet chocolate
  • 14 oz cold heavy cream
  • 3 large egg whites
  • 2 tbs sugar
  • Sweetened whipped cream (for garnish, optional)
  • Shaved chocolate (for garnish, optional)

Place a large mixing bowl and beaters in the freezer for 5-10 minutes.  While they are chilling, melt the chocolate in a double boiler at a low simmer.  Remove from heat and let stand.

Take the mixing bowl and beaters out of the freezer, and beat the cold heavy cream until it forms soft peaks.  Set aside at room temperature.

With a very clean large mixing bowl and cleaned beaters,  whip the egg whites until soft peaks form.  Add the sugar gradually, and continue whipping until the mixture becomes firm.

Using a spatula, add the cooled melted chocolate to the egg whites and sugar.  Then use a whisk to combine these ingredients gently.  Add in the whipped cream until uniform.  Place the chocolate mousse in decorative glasses, and cover with plastic wrap.  Refrigerate for 1+ hour, and serve chilled.  Top the mousse with sweetened whipped cream and shaved chocolate for an optional garnish.

From Scissors & Sage

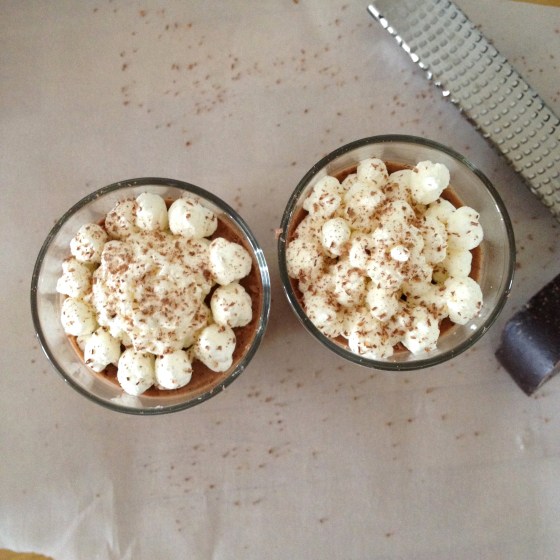
If you’re looking for a last minute dessert or a surprise treat for a loved one, this chocolate mousse doesn’t require too much time or elbow grease.  It is sure, however, to impress.  Here’s to a lovely Valentine’s Day!

Comment Contest!

Comment Contest

Today marks Scissors & Sage’s first comment contest!  The rules are simple: Comment on any post on this blog and your name will be entered to win a mystery treat from me!  This treat is Valentine’s-themed, and will arrive in time for February 14th.  The deadline to comment is this Friday, February 7 at midnight EST, so get commenting!

PS) Be sure to enter your email address when leaving a comment so that I can contact the winner.

Lemon-Blueberry Yogurt Cake

This cake is a miracle cake.  It simultaneously satisfies many cravings: citrus, berry, and creamy-rich-moist goodness.  It can be served for breakfast with coffee or tea, as a mid-afternoon snack, or as an after dinner dessert when paired with vanilla ice cream.  Brilliant!  This recipe comes from good old Smitten Kitchen (who adapted it from Ina Garten).  This cake can be whipped up for yourself, a loved one, or may act as a nice contribution for a dinner party or potluck.  And the best part?  The blueberries can easily be replaced with any other small fruit like cut strawberries or raspberries.

Lemon-Blueberry Yogurt Cake (via Smitten Kitchen)

Prep time: 15 minutes | Bake time: 50 minutes | Yields: 1 cake

Cake ingredients:

  • 1 1/2 cups and 1 tbs flour
  • 2 tsp baking powder
  • 1/2 teaspoon salt
  • 1 cup plain whole milk yogurt
  • 1 cup sugar
  • 3 extra large eggs
  • 2 tsp grated lemon zest
  • 1/2 tsp vanilla extract
  • 1/2 cup vegetable oil
  • 1 1/2 cups blueberries

Glaze ingredients:

  • 1/3 cup fresh lemon juice
  • 1 tbs sugar

Preheat oven to 350°F.  Grease and flour a loaf pan.  In a medium bowl, sift 1 1/2 cups flour, baking powder, and salt.  In a large bowl, whisk yogurt, 1 cup sugar, eggs, lemon zest, vanilla, and oil.  Slowly whisk the dry ingredients into the wet ingredients.  Toss the blueberries and 1 tbs of flour in a small bowl.  Mix those into the batter carefully.  Pour the batter into the loaf pan and bake for 50 minutes, or until a toothpick comes out clean from the center.

While the cake is in the oven, combine the lemon juice and 1 tbs sugar in a saucepan over low heat.  Set the mixture aside once the sugar dissolves and appears clear.

When the cake is done, let it cool for 10 minutes.  Then transfer it to a cooling rack.  Place the cooling rack inside a cookie sheet pan.  Gently drizzle the glaze over the cake while the cake is still warm.  (Making tiny toothpick holes in the top of the cake first will allow the glaze to seep into the cake slightly.)  Let the cake cool and enjoy!

From Scissors & Sage

Note: Photos by Anne Kenealy.

Valentine’s Card Crafting

If you should know one thing about me, it is that I love a good Valentine’s Day.  Perhaps it’s the sweet treats and baked goods, or perhaps it’s the fond memories of crafting shoebox mailboxes for collecting Valentine’s cards in elementary school.  Or perhaps it’s the many flowers.  Whatever it is, I certainly have a spring in my step come February 14th.  Now, I fully understand that Valentine’s Day is not for everyone (for some unknown reason).  If you are one of those people, it is my hope that I will help you enjoy, or at least tolerate, Valentine’s Day a little bit extra this year.

I recently had a few friends (and fellow creative arts therapy folk) over to my apartment for an afternoon of crafting and relaxing – two things that go very well together.  Our main project of the day was making Valentine’s and birthday cards for loved ones.  I really enjoy making cards for a few reasons.  First, it is a relatively easy crafting project that does not require much prep or clean up.  Second, making homemade cards is way more fun than paying $4.95 for a card at a store.  My trick is to peruse Paper Source every few months and take pictures of cards that I like.  Then I go home and make them myself!

Below are the cards I worked on for Valentine’s Day.  I decided to use the February 2013 issue of Better Homes and Gardens as my envelope material, and then cut colored note paper to match.  (I stopped subscribing to BHG; however, any craft magazine’s February issue would be appropriately themed, regardless of the year).  Here are step-by-step photos of my envelope-making process.  These can be cranked out rapid-fire once you get the hang of it!

Making an envelope:

  1. Choose a preexisting envelope and take it apart at the seams.
  2. Find an image from a magazine or newspaper that fits the unfolded envelope.
  3. Use a marker to draw a line around the unfolded envelope on the page.
  4. Cut around that edge.
  5. Use a bonefold to fold the image into an envelope shape.
  6. Tape the envelope sides shut using double-sided tape.

This heart stamp was created using a wine cork and an Xacto knife.  The key to a successful wine cork stamp is to make sure the design surface is flat.  Otherwise, the entire image will not transfer.  Leave a comment with any questions or suggestions for other crafty card designs.  These only skim the surface!

Thrifting With: Anne Kenealy

Victoria and I spend a lot of time in thrift stores. There’s nothing quite like that rare delight of finding the perfect kitchen chair or end table for only a few dollars. Far more often, though, I find myself wading through piles of legless tabletops and stained armchairs, wondering if I have the time, elbow grease, and expertise needed to transform a long-unloved piece of furniture into something beautiful and useful.

A few summers ago, I was wandering through a thrift shop in Platteville, Wisconsin, where my family keeps a hobby farm. In the rural Midwest, folks tend to hang on to their belongings for a long time, resulting in a local thrift shop filled with decades-old treasures. I happened upon this desk:

It was covered in chipped faux-bois veneer and the drawers didn’t close just right. However, I had borrowed the pickup truck, I had a spot to stow the desk until I could get around to working on it, and it was only $3. Perhaps most importantly, it was summer, so I had time to kill and an apartment to fill when Victoria and I moved to Philadelphia a few months later.

With my wise father and Google as dual advisors, Victoria and I set to work painting and restoring The Desk. Because its veneer is plastic, getting a few even, thorough coats of paint took some ingenuity, but a project similar to this one is easily doable in a few hours over a couple of days.

Materials:

If you’re a furniture-refurbishing wizard, you already know: clean, sand, clean, prime, clean, paint. However, if, like me, you run with the Design*Sponge-ogling common folk and the list of materials above was enough to make you decide against this project, don’t turn away just yet. This project is simple and yields great results.

  1. You’ll first want to clean the piece thoroughly with TSP. Because TSP is such a powerful cleaning agent, it is recommended that you wear rubber gloves and work in a well-ventilated space. We used the great outdoors. (It is also recommended that you don’t walk into a home improvement store asking for “trisodium phosphate” like we did. No one seems to refer to TSP by its full chemical name, and our clerk looked at us like we were Walter and Jesse back for a re-up.)
  2. Using fine sandpaper, rough up every surface you intend to paint. With a plastic veneer, this step might be the most painstaking of the entire project, but it pays to sand well. The better you sand a surface, the more likely the spray paint is to stick.
  3. After sanding, clean the piece once more with TSP, then run a tack cloth over the whole thing to remove any grit or dust. If you intend to prime later, wipe the piece down with a tack cloth once more just prior to priming. It really pays off.
  4. If you want the legs or drawer pulls of your piece to remain untouched by spray paint, remove them or cover with painter’s tape. Then spray an even coat of primer over every surface you intend to paint. Attaining the “even coat” was a process, so it helped me to practice on a sheet of newspaper first. Let dry for a few hours or overnight.
  5. Once the primer has dried, run a tack cloth over the piece again. Spray a thin, even coat of paint, taking care not to linger too long in any given spot. With each coat, it is better to apply too little paint than too much. Let dry for a few hours or overnight.
  6. If you have overapplied paint anywhere, you can sand down the pools or bubbles that may have formed and then clean any dust away with a tack cloth. Then apply a second coat of paint, attending to the bottom of any overhangs and the edges of drawers.
  7. Once dry, make sure the richness of the color is consistent and that the satin shine is even across the piece. If you feel you need a third coat of paint, feel free to apply. (This may require a second can of paint, depending on the size of your piece.)

Ta-da!

To add a nice finishing touch to this desk, we asked my dad to polish the tips of the legs with Brasso and some fancy buffer tool that I don’t pretend to know how to use. The most exciting part of this project was finding drawer pulls that suited the style of the desk; we discovered  Menards had a nice selection.

The chair isn’t a perfect fit for the desk, but it was $5 at Uhuru, a thrift shop around the corner from our apartment. Victoria and I found the birch tree needlepoint at the Platteville Thrift Shop on a later trip, and spray painted the frame a glossy black. The antique desk lamp has a cast iron base and is on loan from my dear old ma.

A refurbishing project like this one may seem labor-intensive, but the payoff is great. Here’s to more lonely thrift store cast-offs receiving similar treatment!

-Anne