Brookie Rookie

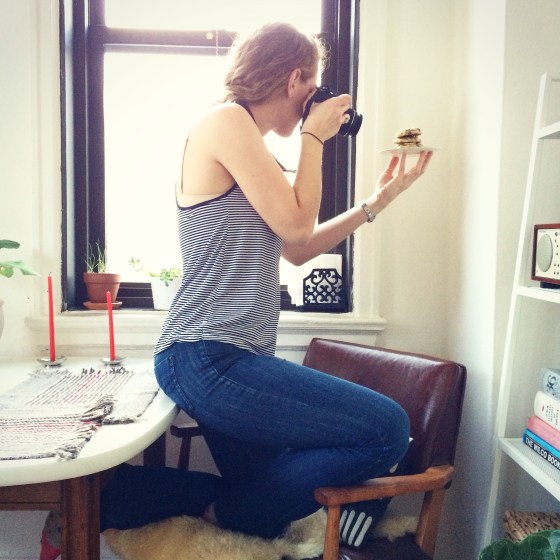
I can’t tell if I’m late to the party or not, but I found out about brookies (part brownie / part chocolate chip cookie) only in the last few months. I was in awe when I saw them on Urban Bakes, and dropped everything to make them with Anne.

I was glad that Anne and I split the baking duties because it is essentially two recipes in one cookie. That’s a lot of prep work! Good thing brookies are hands-down worth it.

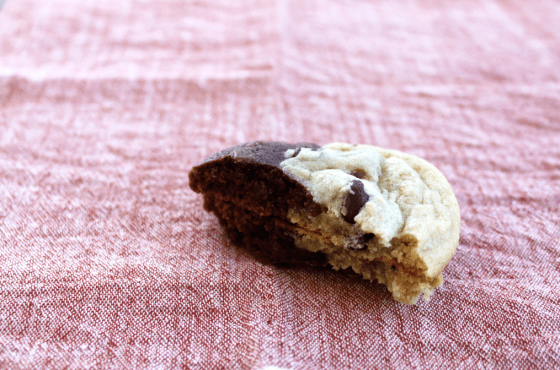
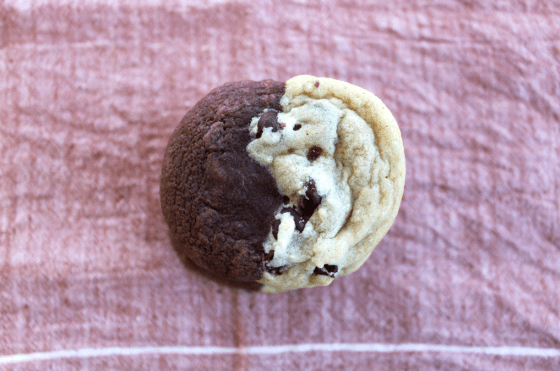
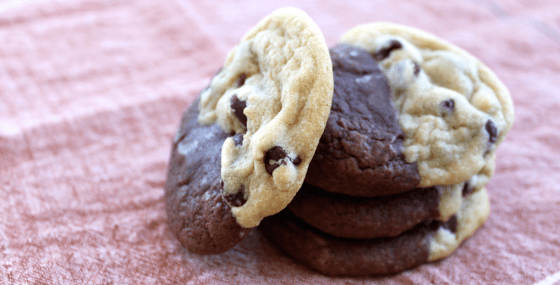
It was as if Brownie spent its whole life walking around believing it was whole. Later on, Brownie met Chocolate Chip Cookie, its other half, who complemented it in all of the ways it never knew it needed. Together, Brownie and Chocolate Chip Cookie made a new kind of whole. They are a match made in heaven.

What are you waiting for? Get baking!

The Ultimate Brookies (adapted from Urban Bakes)

Prep time: 30 minutes | Bake time: 10 minutes per batch | Yields 36 brookies + 18 chocolate chip cookies

Brownie ingredients:

  • 1 1/4 cups all-purpose flour
  • 1/2 tsp baking powder
  • 1/2 tsp salt
  • 1/3 cup unsalted butter
  • 2 oz unsweetened chocolate, chopped
  • 1 cup granulated sugar
  • 2 eggs
  • 1 tsp vanilla extract

In a small bowl, combine flour, baking powder, and salt. Set aside. In a large bowl, mix together sugar, eggs, and vanilla. Set aside. Melt the butter and chocolate in a saucepan on medium-low heat. Once the butter and chocolate have cooled, add this to the sugar, eggs, and vanilla mixture. Stir with a fork. Add the flour mixture and stir again until fully incorporated. Cover with saran wrap and refrigerate for two hours.

Chocolate Chip Cookie ingredients:

  • 1 1/4 cups granulated sugar
  • 1 1/4 cups packed light brown sugar
  • 1 1/2 cups unsalted butter, softened
  • 2 tsp vanilla extract
  • 3 eggs
  • 4 1/4 cups all-purpose flour
  • 2 tsp baking soda
  • 1 tsp salt
  • 2 1/2 cups semisweet chocolate chips

In a large bowl, use an electric mixer to cream granulated sugar, light brown sugar, and butter until light and fluffy. Beat in vanilla and eggs until blended. Use a fork to stir in flour, baking soda, and salt. Add chocolate chips and incorporate with your clean hands or a spatula. Cover with saran wrap and refrigerate for two hours.

Once the two doughs are chilled, preheat the oven to 350°F. Line two baking sheets with parchment paper. Use a 1″ spring-loaded ice cream scooper to dispense six mounds of brownies onto each baking sheet. Clean the scooper, and dispense chocolate chip cookie dough next to each brownie round. Join the two cookies using your hands to close any gaps. (This may require pinching or light molding.)

Bake brookies for ten minutes, switching rack positions at the five-minute mark. Let brookies cool on the baking sheet for one minute before transferring to a cooling rack. Serve immediately, or store in an airtight container for up to one week. Enjoy!

Notes:

  • To keep the dough chilled between baking shifts, keep it covered in the refrigerator.
  • You will have ample chocolate chip cookie dough left over, as the two recipes are not quite even. I’m keeping my cookie dough in the freezer, so as to have it on hand for when friends and family visit!

From Scissors & Sage

Mini Chocolate and Berry Bundt Cakes With: Tala Ginsberg

I realize that I’ve been heavy on the guest blog posts these days, but I just can’t help myself! It’s so fun hearing from other passionate crafters and bakers and the like. The first guest blog post of 2015 came from Elaine Burns, who taught us how to arrange a beautiful bouquet of flowers. The second guest post was from Jayme Henderson of Holly & Flora. She shared a delicious blood orange whiskey cocktail recipe with us. Next up: Tala Ginsberg. She is a Speech and Language Pathology student by day, creative baker by night. We went to college together, and we were both music majors.

Tala runs her own baking business called Eats and the City (@eatsandthecity on Instagram), and comes up with all kinds of mouth-watering recipes. When we spoke about her guest posting on Scissors & Sage, she asked what type of dessert I had in mind. I told her I like the combination of chocolate and berries, and she took it from there. Below you will find her story and recipe!

From Tala: I have always been a passionate baker. I started baking around the age of six or seven on my own, though when I was that young it was basically boxed cakes and Pillsbury cookie dough tubs! When I spent time at home with my nanny, I remember going to the basement to get a box of brownie or cake mix to make on my own. I would always have to ask my nanny to hold the bowl while I scraped the batter into the cake pan because my little hands couldn’t do it all!

I essentially started Eats and the City because I was constantly baking and putting the end results on my personal Instagram. One day, my roommates encouraged me to consider making an Instagram just for my food. Originally, I was against it because it seemed like too much work but, after giving in, I became addicted to it! My favorite part of @eatsandthecity is seeing peoples’ reactions. That’s the best part of baking in general.

For the past couple of years or so, I’ve tried not to make the same thing twice (except classic chocolate chip cookies, which you can never make too many of). I always try to switch it up, even if it’s the same base recipe (for example, brownies) but with a new twist. A few years back, I started asking my friends to pick one ingredient on their birthdays. From there, I decided on what dessert to make for them. It has ranged from ice cream cake with toasted marshmallows to cinnamon sugar brownies. I also find a lot of inspiration from Pinterest.

This year, I am focusing on gaining @eatsandthecity followers. I want people to become interested in the desserts that I make. The more people see what I’m making, the more helpful feedback I get. Everything I make for EatC is homemade, so the feedback is important to me. I’d love to one day open a bakery, and I see this as my own mini-start to that dream.

Mini Berry Surprise Bundt Cakes (adapted from Hip Foodie Mom)

Bake time: 20-25 minutes | Yields: Makes four 6” Bundt Cakes

Ingredients for the cake:

  • 1 ½ cups room-temperature brewed coffee
  • 1 cup unsalted butter (at room temperature)
  • 1 cup cocoa powder
  • 2 cups white granulated sugar
  • 2 cups all-purpose flour
  • 1 ¼ tsp baking soda
  • ½ tsp salt
  • 2 eggs
  • 1 ½ tsp vanilla

Ingredients for the ganache:

  • 1 cup semisweet chocolate chips
  • 2/3 cup heavy cream
  • ½ tsp vanilla

Ingredients for the extras:

  • Mixed berries (I used blackberries, raspberries and strawberries.)
  • Powdered sugar

For the cake: Preheat oven to 375°F and coat bundt pans with cooking spray to ensure that the cakes will pop right out. In a small bowl, combine flour, baking soda, and salt. In a large bowl, cream softened butter and granulated sugar. Beat eggs into the large bowl one at a time until light and fluffy. Add cocoa powder and mix thoroughly. Stir in coffee until well-mixed. Next, add the flour mixture to the large bowl. Once the mixture is well-combined, pour the mixture into the bundt pans. Bake for approximately 20-25 minutes, or until a toothpick comes out clean. Let cakes cool before adding the extras.

For the ganache: Pour the chocolate chips into a medium bowl and set aside. Combine the heavy cream and vanilla extract in a saucepan on the stove. Heat on low until little bubbles form around the edges. Leave on for approximately 30 seconds. Pour this hot mixture over the chocolate chips in the bowl. Use a whisk to mix and thoroughly combine until chocolate chips are melted. Pour over bundt cakes and serve with extras.

From Scissors & Sage

All photos taken by Tala Ginsberg

A Twist on the Chocolate Chip Cookie

While Christmas may be behind us, I’ve still got food–specifically dessert–on the mind.  Are you spending New Year’s Eve with friends or family?  Were you invited to a potluck but don’t know what to make?  Today, I’ve got a recipe for you that is a surefire crowd pleaser.  This take on the traditional chocolate chip cookie comes from Averie at Averie Cooks: Recipes for Sweet Teeth.  Her blog post was easy to read, had great photos, and provided clear baking instructions–a real keeper in my book!

Without further ado, here is my version of Averie’s cookies:

When I first read that these cookies had cream cheese in them, I thought it was strange.  How could cream cheese taste good in a chocolate chip cookie?  Averie assures readers that the cream cheese is indistinguishable in the cookies, and that it helps keep them soft and gooey, just how I like it! I’m so glad that I decided to whip these up because I will probably never make chocolate chip cookies again without adding cream cheese into the recipe.  They’re that good.

Below is a behind-the-scenes picture of me trying to photograph these cookies in natural light. This is definitely what a homespun photoshoot looks like!  (Photo by Anne Kenealy)

Here’s the recipe!

Cream Cheese Chocolate Chip Cookies (via Averie Cooks)

Prep time: 15 minutes | Bake time: 8 minutes per batch | Yields: 24 cookies

Ingredients:

  • 1/2 cup unsalted butter, softened
  • 1/4 cup cream cheese (original, full-fat type)
  • 3/4 cup light brown sugar, packed
  • 1/4 cup granulated sugar
  • 1 large egg
  • 2 tsp vanilla extract
  • 2 1/4 cups all-purpose flour
  • 2 tsp cornstarch
  • 1 tsp baking soda
  • 1/4 tsp salt, optional
  • 1 cup semi-sweet chocolate chips
  • 1 1/4 cups semi-sweet chocolate chunks

Using an electric hand mixer or stand mixer, combine butter, cream cheese, sugars, egg, and vanilla.  Beat on medium-high speed until well-creamed, light, and fluffy (5-7 minutes).  Scrape the sides of the bowl with a spatula.  Add flour, cornstarch, baking soda, and optional salt.  Mix only until combined (1 minute).  Add chocolate chips and chunks into the mixture.  Fold in using a spatula.

Place 3 large plates on your workspace.  Scoop 2-inch cookie dough mounds onto the plates, pressing them slightly into round formations.  Cover the plates with plastic wrap and refrigerate the dough for 2+ hours.  (You can stop here, if you wish, and bake the cookies up to 5 days later.)  Letting the dough chill will allow for taller, fluffier cookies.

Preheat the oven to 350°F.  Allow chilled cookies to sit out for 10 minutes.  Transfer the dough mounds to non-stick baking sheets or buttered regular sheets, placing them 2 inches apart.  Bake cookies for 8-10 minutes, switching rack positions halfway through.  Do not bake the cookies for more than 10 minutes even if they do not appear to be done.  They will continue baking after they come out of the oven.  Allow cookies to cool for 5 minutes on the baking sheets before transferring them to a wire rack.

Enjoy these cookies within the week, or freeze them for up to 3 months.

From Scissors & Sage

Project Roundup: Holiday Inspiration!

I have to confess that I did not pre-plan a blog post for today.  I practically forgot that today is Monday.  Anne and I had a wonderful weekend together, as we celebrated our 6-year anniversary! We purchased our very first Christmas tree — a little guy, about 2.5 feet tall — that fits perfectly in our apartment, and enjoyed a delicious dinner at probably our favorite restaurant in Philly.

In conclusion: I didn’t write a blog post.  So, today I have for you a nice roundup of a few giftable projects I’ve created here on Scissors & Sage.  I hope that they inspire you to make something special for a loved one this holiday season.  And if they don’t inspire you — well, let me make it for you!

EDIBLE

These Perfect Peanut Butter Cookies really are perfect.  If you don’t believe me, make them yourself and find out!

Make Quick & Simple Fudge for your holiday hosts, family members, or friends.  It makes a big batch that can be distributed among many.

These Chewy Chocolate Jumbles are delicious, and can be customized with all kinds of added ingredients like nuts or dried fruit.

NON-EDIBLE

Make someone happy with this Honey Citrus Hand Scrub.  It smells incredible, and leaves your hands feeling very soft.  Easily gift it in a small jar.

This DIY Stencil Pillow is a labor of love.  There’s still plenty of time to begin working on lengthy DIY holiday gifts!  (This was also, believe it or not, the first project I ever posted on Scissors & Sage!)

Learn to make these Mirror, Mirror bathroom signs that are only readable when viewed through the mirror.  Check out the first installment of Mirror, Mirror here, too!

Feel like knitting?  This Cowl Me Crazy project has you covered.

These DIY Pencil Eraser Stamps require few materials and yield great results.  Use these stamps to create a matching set of custom stationery for a friend or loved one.  Need envelope inspiration?  Look here, and be sure to use old December issues.

Do you know someone who loves cooking or baking?  Give them the gift of a curated recipe box.  First, find a beautiful recipe box.  Second, learn to create custom dividers (see link).  Third, add recipes you think your gift recipient will enjoy — perhaps recipes that are important to you!

These DIY Dragonfly Earrings are cute and simple for the nature lovers in your life.

Make a statement with this Oscar Wilde Stencil Art.  It’s easily customizable if you know your gift recipient loves a specific quote.

I hope you enjoyed this roundup.  Be sure to let me know if you make any of these projects!  Share your creations using #scissorsandsage on Instagram and Twitter.

Spooky Chocolate Cake Doughnuts

A few weeks ago, Anne received a care package in the mail from her mom, Janet.  Among the goodies were tools to make Halloween-themed treats: a mini doughnut pan and spooky sprinkles!  It’s always exciting to add new kitchen gadgets to our ever-growing collection.

Anne decided to whip up a batch of cake doughnuts this weekend using the recipe from the pan’s packaging.  They are delicious, and were incredibly easy to make.  It was a fun project for a Saturday afternoon at home.  Below, I’ve created a “recipe view” so that you can print it for easy access and use in your own kitchen!

Spooky Chocolate Cake Doughnuts (via Norpro)

Prep time: 15 minutes | Bake time: 8 minutes | Yields: 24 doughnuts

For the batter:

  • 1 1/2 cups flour
  • 1/3 unsweetened baking cocoa
  • 1 tsp baking powder
  • 1/8 tsp salt
  • 2 eggs
  • 2/3 cup sugar
  • 1 tsp vanilla
  • 1/2 cup milk
  • 2 tbsp butter, melted

For the glaze:

  • 1 cup confectioner’s sugar
  • 2 tbsp hot water

Before starting, here are some items that you will need: Mini doughnut pan, cooking or baking spray (we used Crisco brand), and spooky sprinkles

Preheat oven to 325°F.  In a large mixing bowl, combine flour, cocoa, baking powder, and salt.  In a medium mixing bowl, combine eggs, sugar, and vanilla until thick.  In a small mixing bowl, combine milk and butter.  Alternately combine egg mixture and milk mixture into the flour mixture.  Blend until smooth and soft.

Spray pan lightly with cooking or baking spray.  Pour batter into a piping bag, and fill doughnut molds 2/3 full with batter.  (Or, pour batter into a gallon-sized Ziploc bag and squeeze batter down into one corner.  Using scissors, snip one tip of the Ziploc to create an opening of no more than 1/8″.)  Bake for 8 minutes, or until toothpick comes out clean.  Carefully transfer doughnuts to a cooling rack.  Repeat with the rest of the batter.

Combine glaze ingredients in a small bowl.  Dip tops of cooled doughnuts in the glaze, and finish with spooky sprinkles immediately.  Enjoy!

From Scissors & Sage 

After taste-testing a doughnut (read: several doughnuts), both Anne and I felt that they could have tasted a bit more chocolatey.  Let us know if you make these at home, or if you experiment with adding more chocolate flavor.  What other spooky recipes have you been making this Halloween season?  Tag photos on Instagram with #scissorsandsage!

Lead chef and hand model: Anne Kenealy