Triple Chocolate Chip Cookies for Willie

Are any of you in the U.S. watching season 5 of Masterchef right now?  I am.  Although I watch on Tuesday nights because we don’t have cable.  Last night I witnessed the top 7 turn into the top 6, and I was devastated to see Willie go.  Beyond his original dish ideas and complex flavor profiles, he seemed to always keep his spirits high in the Masterchef kitchen, and was always incredibly humble.  I may or may not have welled up at the end of the episode.  Willie’s grandmother puts it best: “Your attitude will always determine your altitude.”

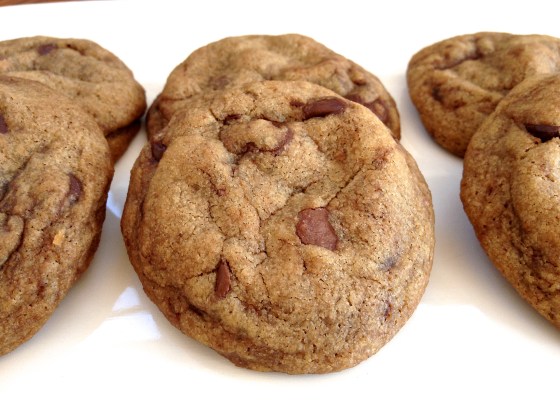
In honor of Willie, I decided to try a new recipe tonight.  These cookies, adapted from Baker by Nature, are unlike any cookies I’ve ever made.  While I initially felt defeated by the semi-unfamiliar baking procedure, I realized that Willie had to try many new things while on Masterchef, too.  He would appreciate these cookies, as they are delicious and sure-fire crowd pleasers.  So here goes!

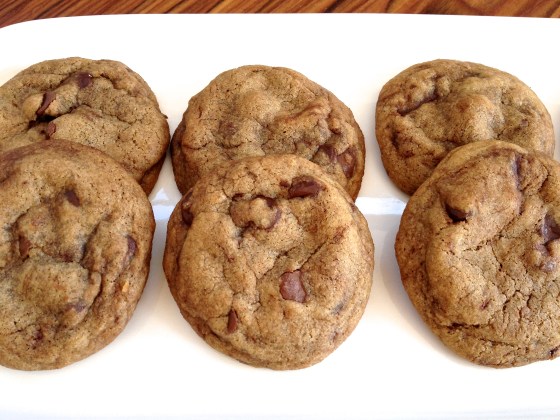
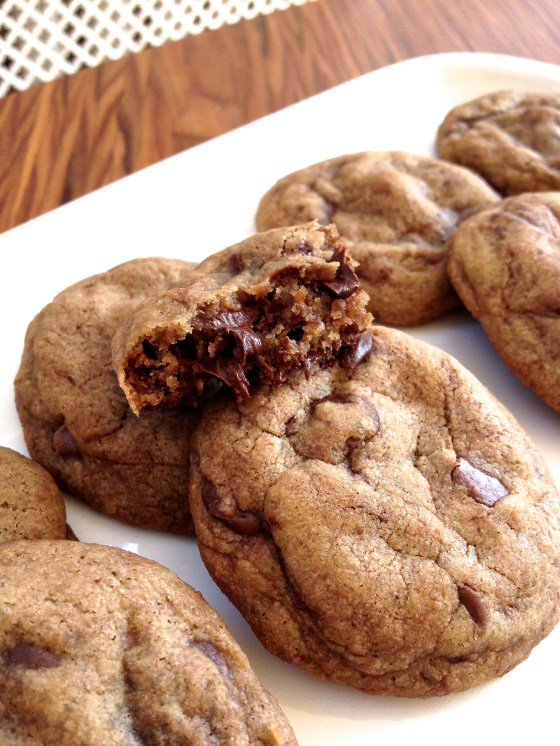
Triple Chocolate Chip Cookies for Willie (adapted from Baker by Nature)

Prep time: 20  minutes | Bake time: 10 minutes per batch | Yields: 32 cookies

Ingredients:

  • 2 cups all-purpose flour
  • 3/4 tsp baking soda
  • 1/2 tsp flakey sea salt
  • 15 tbs salted butter
  • 1 cup dark brown sugar
  • 1/2 cup granulated sugar
  • 1 tsp vanilla
  • 2 large eggs
  • 1 cup milk chocolate chips
  • 1 cup semi-sweet chocolate chips
  • 1/2 cup dark chocolate chunks

Preheat oven to 375°F.  Line two baking sheets with parchment paper and set aside.

In a medium-sized bowl, fork together the dry ingredients and set aside.

Place 8 tbs of butter in a wok or large saucepan over medium heat.  Cook for about 2 minutes, stirring constantly, until the butter had browned.  Remove from heat and stir in remaining 7 tbs of butter.  Add the sugars and vanilla to the melted butter.  Whisk until combined.  Add eggs and whisk together vigorously for 30 seconds.

Let wet mixture sit idle for 5 minutes, then repeat 30-second whisking.  Gently fold in the flour with a spatula.  Once the flour begins to disappear, fold in the three chocolate varieties.

Roll cookie dough into 2-tbs balls with your hands.  Be sure to place enough space between the cookies on the baking sheets.  When both sheets are prepared, bake cookies for 10 minutes, switching rack positions halfway though.  Let cool and transfer to a wire rack.  Continue until all cookie dough is used.

From Scissors & Sage

Do you have a go-to chocolate chip cookie recipe?  Or a favorite Masterchef contestant?  Who do you think will win the Masterchef title this season?

PS) Check out these Chewy Chocolate Jumbles I made last year–quite a different cookie, but just as tasty!

A Morning at Quail Hill Farm

Last weekend, Anne and I took a drive out to Amagansett, NY to see my family.  It’s that time of year when you try to squeeze in that final beach vacation or time spent with loved ones before the fall rolls around.  My aunt, uncle, and twin cousins live in a cozy house tucked away on a dirt path, removed from the hustle and bustle of the Hamptons but close to the beach.

Early Saturday morning, my aunt Melanie took a few of us to Quail Hill Farm, the Community Supported Agriculture (CSA) farm she belongs to.  I have memories of going to this farm from when I was a kid, eagerly scouring dirt patches with my cousins to dig up potatoes from the ground.  Digging for potatoes proved to still be one of my favorite activities, but going back now, I realize just how much this farm has to offer: Quail Hill Farm is one of the original CSAs in the United States!

We were amidst the veggies, herbs, and flowers for a few hours, and we entered a trance-like state from the sheer happiness of gathering food straight from the source.  (The feeling reminded me of the days when I worked at Stone Barns Center for Food and Agriculture.)  We weren’t the only ones out there, either.  Our morning excursion included friendly community farmers, each teaching the other how to cook this, and how to identify that.  No one was texting; no one was snapchatting.  We were all enjoying the beautiful weather, the pretty wildflowers, and each others’ company.

Below is a sampling of pictures that represent the treasures that we picked.  Keep reading for a full list of what we found!

We harvested:

  • Curly parsley
  • String beans (green, purple, white)
  • Hakurei turnips
  • Heirloom carrots (orange, purple, white)
  • Fingerling potatoes
  • Italian eggplant
  • Japanese eggplant
  • Cucumbers (green, white)
  • Peppers (green, purple, red, orange)
  • Heirloom tomatoes (cherry, grape, black cherry, green zebra, peach, red zebra, San Marzano, pear-shaped, pink)
  • Zucchini
  • Artichokes
  • Garlic
  • Onions (yellow)
  • Lettuce (green and red)
  • Cabbage
  • Wheatberries

Also:

  • Wildflowers
  • Sunflowers
  • Fresh bread

Here we are at the end of it all!  It is certainly an experience we will all remember for a long time to come.  Do you belong to a CSA?  Do you grow your own produce at home?  Respond to these questions and share your thoughts in the comments section below.

Blackberry-Apple Hand Pies

One of the things I am most grateful for in my life is the fact that I was raised around food.  It’s not that I ate like a 5-year-old queen (which I did), but that the memories I have of spending time with my family in the kitchen are remarkably strong.  Whether we were cooking, baking, eating, or talking (we were always talking), the kitchen was our gathering spot.  Three of my four Italian grandparents were incredible cooks and bakers.  The fourth was known more for his eager appetite — the way to his heart was through his stomach!  Recently, I have been adapting the skills and values that I learned from my grandparents as I begin to find my way around my own kitchen.

In today’s recipe, I have used my grandpa’s beloved cookie cutter, my mom’s dough-rolling technique, and Anne’s grandma’s flakey dough recipe.  While I had never in my life eaten a hand pie until the very moment they came out of my oven, these are something that I am sure my grandparents would have enjoyed eating.  Who wouldn’t like a mini pie?

In The Flavor Thesaurus, Niki Segnit writes about the pairing of blackberry and apple as follows: “Like Simon and Garfunkel: perfectly respectable solo careers, can go octuple platinum together.  Apple is Simon, by the way, the dominant partner.  Blackberry does the high notes.”

Blackberry-Apple Hand Pies

Prep time: 45 minutes | Bake time: 30-35 minutes | Yields: 10 pies

Compote ingredients (Adapted from epicurious):

  • 2 cups blackberries
  • 1 large golden delicious apple, peeled and cut into 1/4-inch cubes
  • 2 1/2 tbs all-purpose flour
  • 1/4 tsp cinnamon
  • 1/2 cup white sugar
  • 1/4 cup milk
  • 2 tbs demerara sugar

Virginia’s Flakey Dough ingredients:

  • 2 cups flour, sifted
  • 1 tsp salt
  • 3/4 cup shortening
  • 4 tbs cold water

In the morning, whip up a batch of Virginia’s flakey dough.  Combine flour, salt, and 1/2 cup of shortening in a medium-sized bowl.  Use two butter knives to make criss-cross motions with your hands/arms.  The dry ingredients should begin mixing slightly with the shortening.  Add the remaining 1/4 cup of shortening, leaving it slightly chunkier in pea-sized pieces.  Then, add 1 tbs of water at a time, sprinkling it over the dough and mixing it in with your forefinger.  (I used 6 tbs of water to reach a consistency that I liked.)  Gather the dough in a flattened ball, plastic wrap it, and stick it in the refrigerator for 45+ minutes.  Go relax!

When you’re ready to start the compote filling, put oven racks in the upper and lower thirds of the oven and preheat to 375°F.  In a nonstick saucepan or wok, cook the blackberries, apple, flour, cinnamon, and white sugar on medium heat.  It’s important to stand nearby and stir almost continuously with a spatula.  The mixture will begin to thicken and turn a beautiful deep purple.  After 5 minutes, or when the mixture begins to bubble, set aside in a shallow bowl to cool.  Next, take a whiff.  You’ll get a sneak preview of what heaven smells like.

Enter my mom’s dough-rolling technique: Take the chilled dough out of the refrigerator.  Cut it in half and put half back in the refrigerator, wrapped.  Cut two generously-sized pieces of waxed paper and place the half-ball of dough in between them.  Using a rolling pin, start to shape the dough into a flattened circle.  Turn the waxed-paper setup often to create a circle when rolling.  Roll until the dough has reached 1/4-inch thick.  Peel back the top layer of waxed paper and use a cookie cutter to punch the dough out.  Reserve scraps.

Using a spring-loaded ice cream scooper, place a tsp-sized amount of compote on half of the cutouts.  Brush milk around the edges of these cutouts.  Then, press a second cutout over the compote and into the bottom layer’s edges.  Brush the top of the pie with milk and sprinkle demerara sugar over it.  Use a sharp knife to carefully cut a small “x” shape into the top of the pie.  Transfer completed hand pies to a parchment-lined baking sheet.

Take the other half of dough out of the refrigerator and repeat this process.  Repeat a third time using all of the remaining dough scraps.  (I am a firm believer in No Scrap Left Behind.)

Place the baking sheets in the oven, and set a timer for 15 minutes.  When the timer goes off, switch the baking sheet positions and bake for an additional 15 minutes.  Transfer baked hand pies to a cooling rack when they have reached a golden brown color.

I ended up having about half of my compote mixture left over in the end.  I placed mine in the freezer to make more hand pies in the near future!  These little pies pair nicely with the tartness of Greek frozen yogurt.  They are also easy to pack into any bagged lunch because they are self-contained.

From Scissors & Sage

Some more tips: Note that because this is a lengthy process, I found it helpful to clean as I go.  That way, I don’t have an overload of dishes to wash at the end of my baking.  Make the dough ahead of time.  Take a rest as the compote cools.  These are all suggestions that might help make your baking experience more fun and enjoyable.  Happy baking!

Wooden Crates Three Ways

It’s been almost two years since Anne and I moved to Center City, Philadelphia, and as any well-seasoned renter knows, your apartment wish-list must be quite flexible when searching for a place to call home.  Maybe it’s that you find a great apartment, but it isn’t in an ideal neighborhood.  Or maybe there isn’t a whole lot of natural light, but the location is prime.  When it comes time to decide, something must (usually) be cut from the wish-list.  What are you willing to cut in order to find a home you love?  For us, it was our kitchen.

When Anne and I laid eyes on our apartment for the first time, two things sealed the deal: the natural light and our 20th floor views of City Hall and the Delaware River.  We were less then excited about our tissue box for a kitchen, but we agreed that we could make it work.  As we settled into our new kitchen, we tried out different set-ups and cabinet organization in order to maximize our limited space.  (Keep in mind that our countertops consist of about two square feet, kid you not.)

Enter wooden crates inherited from my parents and found in a thrift store.  These crates have been pretty important in our ongoing kitchen debacle.  We have used them in very different ways to maximize kitchen storage.  Here’s how we’ve used them:

Wooden Crate #1: Spice Rack

We hung this spice rack on the wall next to our stove for easy access when cooking and baking.  It holds everything from salt and pepper to DIY tea bags I made for Anne one Valentine’s Day.  Because we use our spice rack so often, I’ve found it important to reorganize it every few months or so.  It can start to look a bit jumbled from all its use!

Wooden Crate #2: Food Storage Organizer

Since our kitchen is so small, every inch counts here.  I wasn’t about to overlook our above-fridge space, so we found ways to work with the area between the fridge and the cabinets.  Next to our two OXO containers (holding granola bars and tea varieties) is our second wooden crate.  It holds our Ziploc bags, aluminum foil, wax paper, and saran wrap all in one place.  It’s easy to either slide it out or pull it down to see what’s inside.

Wooden Crate #3: Kitchen Linens Holder

One reason why Anne and I accepted our small kitchen for what it was is because the receded wall in the hallway allows space for a butcher’s block.  We inherited this from my sister, and I am eternally grateful.  The butcher’s block allows us to extend the kitchen into our hallway, which is great for entertaining.  We store larger items on its shelves like our toaster, ice cream maker, and colander.  The last wooden crate is used here to hold our kitchen linens.  It holds items such as our extra dish towels, linen napkins, and aprons.

These three crates have helped us overcome some serious frustrations with our kitchen.  When you have limited cabinet space, little to no countertops, and no pantry, it becomes time to think creatively!

Do you have a small kitchen in your home?  How have you overcome its quirks and difficulties?  Please share!

Scissors & Sage Updates!

Hello, blog readers!

Scissors & Sage has gone through some very exciting changes this week — all in hopes of creating a more streamlined, easy-to-access blog!  Here’s what’s new:

  1. You can now find this blog at: www.scissorsandsage.com — Hooray!
  2. You can now email me at: victoria@scissorsandsage.com — Wahoo!
  3. Scissors & Sage is now on TWITTER!  This is a big one, folks.  I had never even looked at Twitter until yesterday, let alone understand how to tweet at people or why the heck hashtags matter in life.  I have already been suspended from my account twice.  Twice.  Clearly, I need some guidance on the subject.

Stay tuned for a Twitter-related contest!  I am trying to increase my number of readers, subscribers, and hits on this blog…so I can use all of the publicity I can get!